Changing your domain nameservers is a key task when switching hosting providers or pointing your domain to a new server. Nameservers act as the internet’s “address book,” directing traffic to your website’s hosting server. In this guide, we’ll walk you through the process of updating nameservers, with specific instructions for telaHosting (including our official nameservers for cPanel and DirectAdmin) and other popular registrars like GoDaddy, Namecheap, and Google Domains. We’ll also include tips to avoid downtime and ensure a smooth transition.
General Process for Changing Nameservers
Here’s the universal process for updating your domain nameservers:
- Find Your New Nameservers: Your hosting provider will supply their nameservers. For example, telaHosting provides
ns1.tela-host.com and ns2.tela-host.com for cPanel hosting, or da1.tela-host.com and da2.tela-host.com for DirectAdmin hosting. Check your hosting provider’s welcome email, control panel, or support docs.
- Log In to Your Domain Registrar: Access the account where your domain is registered (e.g., telaHosting, GoDaddy, Namecheap).
- Locate Nameserver Settings: Look for a section like “DNS Management,” “Nameservers,” or “Domain Settings” in your registrar’s dashboard.
- Update the Nameservers: Replace the existing nameservers with the new ones (e.g.,
ns1.tela-host.com and ns2.tela-host.com if using telaHosting with cPanel).
- Save Changes and Wait for Propagation: DNS propagation can take 24-48 hours. During this period, some users may see the old site while others see the new one.
- Verify the Change: Use tools like whois.domaintools.com or
nslookup to confirm the nameservers have updated after a few hours.
Important Tips Before Updating Nameservers
- Backup DNS Records: If your current nameservers manage DNS records (e.g., MX records for email or subdomains), note them down. You may need to recreate these after switching.
- Minimize Downtime: Propagation delays can cause temporary inconsistencies. Make changes during low-traffic periods if possible.
- Check Email Services: If your email relies on your domain (e.g., Google Workspace), set up MX records with the new provider before switching nameservers to avoid disruptions.
Changing Nameservers with telaHosting
At telaHosting, we have specific nameservers depending on your hosting panel:
- For cPanel hosting: Use
ns1.tela-host.com and ns2.tela-host.com.
- For DirectAdmin hosting: Use
da1.tela-host.com and da2.tela-host.com.
Here’s how to update your nameservers if your domain is registered with telaHosting:
- Get telaHosting Nameservers: Log in to your telaHosting account and locate your hosting details. For cPanel hosting, use
ns1.tela-host.com and ns2.tela-host.com. For DirectAdmin hosting, use da1.tela-host.com and da2.tela-host.com. If you’re unsure, contact our support.
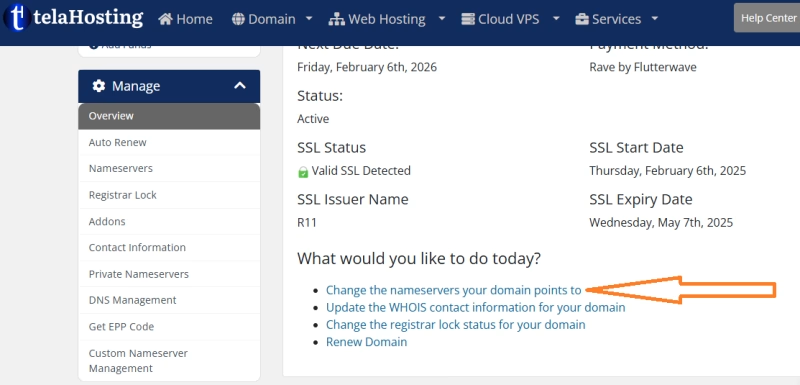
- Access Your telaHosting Domain Dashboard: Sign in to your telaHosting account and navigate to the “Domains” or “Domain Management” section.
- Find Nameserver Settings: Look for “Manage Nameservers” option under your domain’s settings or Click on the particular domain you wish to update its nameservers and click on the “Change the nameservers your domain points to” option as seen below.
- Update the Nameservers: Replace the current nameservers with the appropriate ones for your hosting type (e.g.,
ns1.tela-host.com and ns2.tela-host.com for cPanel).
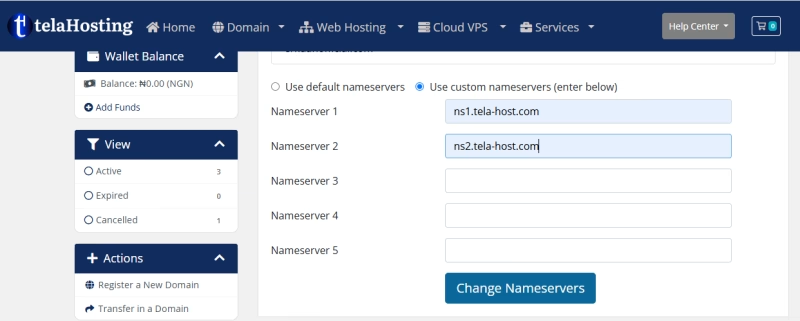
- Save Changes: Click “Change Nameservers”
- Wait for Propagation: DNS changes typically take 24-48 hours to propagate. Check telaHosting’s documentation for estimated timelines.
Changing Nameservers with Other Popular Registrars
If your domain is registered with a provider other than telaHosting, the process is similar but varies by interface. Below are steps for common registrars.
GoDaddy
- Log in to your GoDaddy account and go to “My Products.”
- Find your domain under “Domains” and click “Manage.”
- Scroll to “Additional Settings” and select “Manage DNS.”
- Under “Nameservers,” click “Change.”
- Choose “Custom” and enter the new nameservers (e.g.,
ns1.tela-host.com and ns2.tela-host.com for telaHosting cPanel hosting or da1.tela-host.com and da2.tela-host.com for DirectAdmin).
- Click “Save” and wait 24-48 hours for propagation.
Namecheap
- Sign in to your Namecheap account and go to “Domain List.”
- Click “Manage” next to your domain.
- Under “Nameservers,” select “Custom DNS.”
- Enter the new nameservers (e.g.,
da1.tela-host.com and da2.tela-host.com for telaHosting DirectAdmin hosting or ns1.tela-host.com and ns2.tela-host.com for telaHosting cPanel hosting) and save.
- Propagation takes 24-48 hours, though Namecheap often updates faster.
Google Domains
- Sign in to Google Domains (domains.google.com) and select your domain.
- Go to the “DNS” tab.
- Under “Name servers,” select “Use custom name servers.”
- Enter the new nameservers (e.g.,
da1.tela-host.com and da2.tela-host.com for telaHosting DirectAdmin hosting or ns1.tela-host.com and ns2.tela-host.com for telaHosting cPanel hosting) and save.
- Allow 24-48 hours for propagation.
Cloudflare (Registrar or DNS Service)
- Log in to your Cloudflare dashboard and select your domain.
- If pointing to Cloudflare’s nameservers, they’ll provide them during setup (e.g.,
ns1.cloudflare.com, ns2.cloudflare.com).
- If using telaHosting nameservers, update them at your original registrar (e.g.,
ns1.tela-host.com and ns2.tela-host.com).
What If Your Domain and Hosting Are with Different Providers?
If your domain is with one provider (e.g., Namecheap) and hosting is with another (e.g., telaHosting), follow these steps:
- Obtain the nameservers from telaHosting:
ns1.tela-host.com and ns2.tela-host.com for cPanel, or da1.tela-host.com and da2.tela-host.com for DirectAdmin.
- Log in to your domain registrar (e.g., Namecheap) and update the nameservers as outlined above.
- The registrar will then point your domain to telaHosting’s servers.
Alternative to Changing Nameservers: Using A Records
If you prefer not to change nameservers, you can update the A record to point to your hosting provider’s server:
- Log in to your registrar’s DNS management panel.
- Locate the “DNS Records” or “Advanced DNS” section.
- Update the A record for
@ (root domain) and www to the IP address provided by your hosting provider (e.g., telaHosting will provide an IP like 192.0.2.1). You can find your hosting correct IP from the Welcome email sent to you the moment you purchased your hosting account newly
- Save changes. This avoids changing nameservers but requires manual DNS record management.
This method works for simple setups but can be cumbersome for complex DNS needs (e.g., email or subdomains). Changing nameservers is often more efficient.
Troubleshooting Common Nameserver Update Issues
Website Not Loading After Update
- Propagation may not be complete, wait up to 48 hours.
- Clear your browser cache or flush local DNS (
ipconfig /flushdns on Windows, sudo dscacheutil -flushcache on macOS).
- Verify the nameservers (e.g.,
ns1.tela-host.com and ns2.tela-host.com) were entered correctly.
Email Stopped Working
- If your email provider was tied to the old nameservers, re-add MX records with the new provider or registrar.
- Contact your email provider (e.g., Google Workspace) for the correct records.
Changes Not Reflecting
- Use a DNS checker like dnschecker.org to confirm the nameservers are live.
- Ensure changes were saved and there’s no registrar lock on your domain.
Final Thoughts
Updating nameservers is a routine task for managing domains and hosting, but it requires attention to detail to avoid disruptions. With telaHosting, use ns1.tela-host.com and ns2.tela-host.com for cPanel hosting, or da1.tela-host.com and da2.tela-host.com for DirectAdmin hosting. For other registrars, the process is similar but varies by interface. Always verify your hosting provider’s nameservers and monitor propagation with tools like dnschecker.org.


Need help? Our friendly support team is always here for you! Reach out below.
Happy hosting! 🌟