
An Addon Domain allows you to host multiple websites on a single cPanel account. Each addon domain acts as an independent website with its own content, email accounts, and settings.
- Open your web browser.
- Go to your cPanel login URL (e.g., yourdomain.com/cpanel or cpanel.yourdomain.com or youdomain:2083).
- Enter your Username and Password.
- Click Log in.
Step 2: Open the Addon Domains Feature
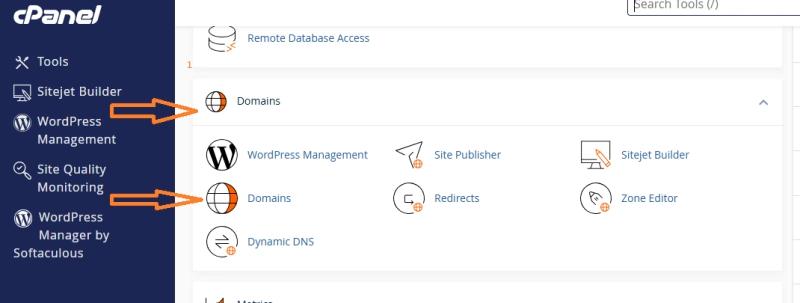
- In the cPanel Dashboard, scroll down to the Domains section.
- Click on Domains.
- On the Next Page click on ‘Create A New Domain‘ button
Step 3: Enter the New Domain Information
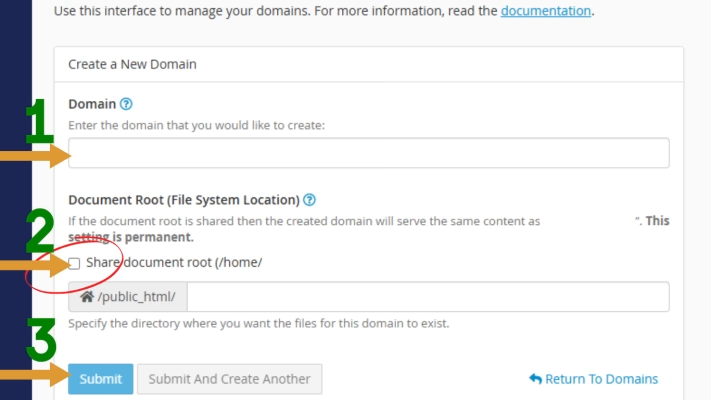
On the Addon Domains page, fill in the required details:
- New Domain Name: Enter the full domain name you want to add (e.g., example.com). The subdomain will automatically be filled based on your domain name. You can leave it as is.
- Document Root: This is the directory where the website files will be stored. By default, it is set to public_html/example.com (It is recommended you uncheck the tick if ticked so that your addon domain will go to the root directory instead of the public_html folder).
- Create: Click on the Submit button to create the addon domain.
✅ Tip: The Document Root is the folder where all your website files will be uploaded.
Step 4: (Optional) Create an FTP Account
If you want a separate FTP account for this addon domain:
- Check the box “Create an FTP account associated with this Addon Domain”.
- Enter a Username and Password.
- Click Create FTP Account.
Step 5: Click “Add Domain”
- Once you’ve entered all details, click the Submit button.
- cPanel will process your request and add the domain.
- You should see a success message confirming the addon domain has been created.
Step 6: Update DNS Settings (If Needed)
If the addon domain is not using the same nameservers as your main domain, you need to:
- Go to your Domain Registrar (e.g., telaHosting).
- Update the nameservers to match your hosting provider’s nameservers (e.g., ns1.tela-host.com, ns2.tela-host.com).
- Wait for DNS propagation (can take up to 24 hours).
Step 7: Upload Website Files (Optional)
- Go to cPanel > File Manager.
- Navigate to the Document Root of the addon domain (e.g., public_html/example.com).
- Upload your website files or install a CMS like WordPress.
Step 8: Test Your Website
After setup, test the addon domain:
- Open a web browser and visit yournewdomain.com.
- If the DNS has propagated, your website should load successfully.
✅ Done! You have successfully created an addon domain in cPanel! 🚀
Troubleshooting Tips
🔹 Domain Not Working?
- Ensure the domain is correctly pointed to your hosting’s nameservers.
- Clear your browser cache or try accessing the domain from another network.
🔹 Cannot Create Addon Domain?
- Some hosting plans have limits on the number of addon domains. Check with your provider.
- Make sure the domain is not already added to another cPanel account.
Let us know if you need more help! Happy hosting 😊


Need help? Our friendly support team is always here for you! Reach out below.
Happy hosting! 🌟