What Are MX Records?
MX records (Mail Exchange) are special DNS records that tell the internet where to deliver your emails. When someone sends you an email for example, [email protected], your MX record tells their email provider which mail server should receive that message.
If your MX records are set incorrectly, your domain might point to the wrong mail server (or none at all). That means emails get lost, delayed, or completely undelivered.
Signs That Your MX Records Are Incorrect
If your MX records are wrong, you’ll start noticing one or more of the following issues:
- You’re not receiving any emails.
- People get bounce-back messages when they try to email you.
- Your outgoing emails don’t deliver properly.
- Emails go to spam folders frequently.
- You recently changed hosting providers or DNS settings.
Step 1: Log In to Your cPanel
- Log in to your telaHosting Client Area using your registered email and password.
- From the dashboard, select your hosting account and click “Log in to cPanel” to access the dashboard
Step 2: Open the Zone Editor
- Inside cPanel, scroll down until you find the Domains section.
- Click on “Zone Editor.”
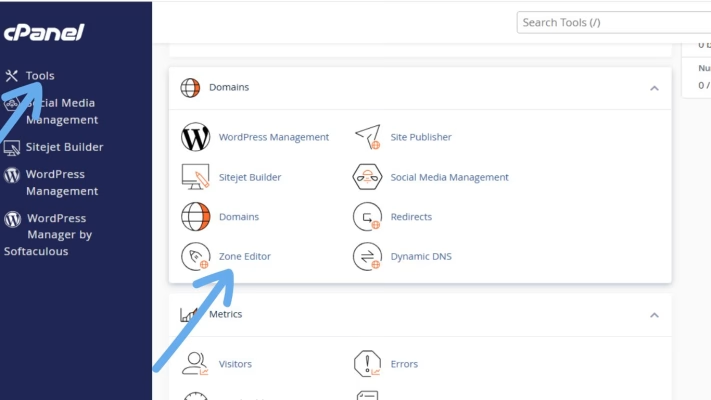
This is where all your DNS records are managed, including A, CNAME, TXT, and MX records.
If you have multiple domains hosted, you’ll see a list. Locate the one where your email issue is happening and click “Manage.”
Step 3: Check Existing MX Records
Once you click Manage, scroll through the list until you find the section labeled “MX” under the “Type” column.
This shows the mail exchange records currently linked to your domain.
Here’s what to look for:
- Make sure the Destination (mail server address) is correct.
- Verify that Priority values are set properly (lower numbers mean higher priority).
- Check for duplicate or outdated entries — especially if you recently changed hosts or email providers.
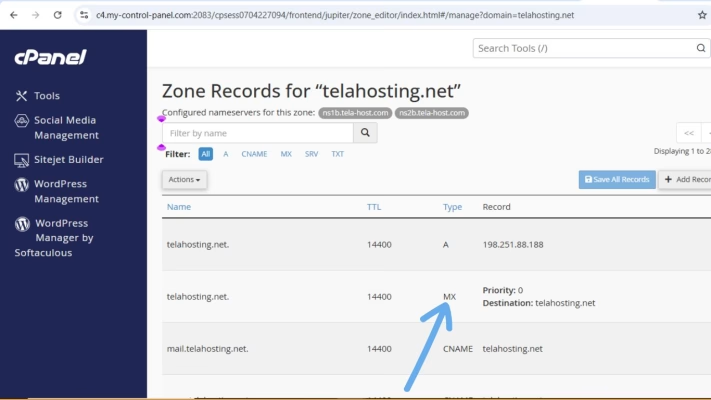
For example, if your MX record still points to mail.oldhost.com but your email is now on telaHosting, that’s a red flag.
Step 4: Remove Incorrect MX Records
If you find any outdated or incorrect MX entries, remove them immediately.
To delete a record:
- Click the “Delete” button next to the incorrect MX record.
- Confirm the deletion when prompted.
This helps avoid confusion between mail servers.
Step 5: Add the Correct MX Records
Click the “+ Add Record” button and choose MX Record from the dropdown menu.
Here’s how to fill in the fields:
- Name: Enter your domain name (e.g., yourdomain.com) or leave “@”.
- TTL (Time to Live): Leave as default (usually 14400).
- Priority: Enter the priority number (e.g., 10 or 5).
- Destination: This is the mail server your email should point to.
If you’re using a third-party email provider (like Google Workspace or Zoho Mail), they’ll give you the exact MX details to enter.
Once you’ve entered everything correctly, click “Save Record.”
Step 6: Verify the MX Entry Is Active
After saving your changes, you’ll see your new MX record appear in the list. Double-check it for typos, even a small error (like a missing dot or extra space) can cause issues.
For example, mail.yourdomain.com and mail.yourdomain.com. (with a trailing dot) can mean different things in DNS systems.
Step 7: Wait for DNS Propagation
Whenever you make changes to DNS (like MX records), it takes some time for those updates to reach all global servers — a process called DNS propagation. This can take anywhere from a few minutes to 24 hours, depending on your ISP and DNS caching.
You can track the propagation progress using a free online tool like DNSChecker.org. Just type your domain, select “MX,” and click “Search.”
Step 8: Test Your Email
- Send an email to your domain address from another provider (like Gmail).
- Check if it arrives in your inbox.
- Try replying or sending an outgoing message to confirm it sends properly.
If both sending and receiving work fine, congratulations! You’ve successfully fixed your email issue.
Bonus Tip: Check Your Mail Routing Settings in cPanel
Sometimes, even with correct MX records, emails still fail because of incorrect routing settings.
To fix this:
- In cPanel, go to Email → Email Routing.

- Select your domain.
- Choose “Local Mail Exchanger”.
- Click Save Changes.

This ensures that your server knows it should handle your mail locally.
Final Thoughts
If your emails aren’t delivering, don’t panic — in most cases, it’s simply because your MX records are misconfigured. By logging into cPanel, checking and correcting your MX entries, and waiting for propagation, you can fix the issue in no time.
Need help? Our friendly support team is always here for you! Reach out below.
Happy hosting! 🌟