What Are SPF, DKIM, and DMARC Records?
1. SPF (Sender Policy Framework)
SPF is like a “permission list” for your domain. It tells mail servers which servers are allowed to send emails on behalf of your domain. For example, if you use telaHosting mail servers or a service like Google Workspace, your SPF record will specify those servers as approved senders.
When a recipient’s mail server receives an email from you, it checks your SPF record. If the email comes from an approved server, it passes. If not, it may be marked as spam or rejected entirely.
2. DKIM (DomainKeys Identified Mail)
DKIM is like adding your digital signature to every email you send. It ensures that your message hasn’t been modified or forged during delivery.
When someone receives your email, their server checks the DKIM signature against your DNS record. If it matches, it confirms that the email came from you and hasn’t been tampered with.
3. DMARC (Domain-based Message Authentication, Reporting & Conformance)
DMARC combine SPF and DKIM to give you control over what happens if an email fails authentication. It lets you tell receiving servers’ things like:
- “Quarantine emails that fail SPF or DKIM.”
- “Reject fake emails pretending to come from my domain.”
- “Send me reports of suspicious activity.”
Basically, it’s the ultimate rulebook for protecting your domain from email spoofing and phishing.
Why You Need SPF, DKIM, and DMARC
- Improves email deliverability: Your emails are less likely to land in spam.
- Builds sender reputation: Email providers trust your domain more.
- Prevents email spoofing: Protects your domain from being used by scammers.
- Secures communication: Keeps your business and customers safe from fraud.
What You Need Before You Start
Before adding SPF, DKIM, and DMARC records, make sure you have:
- Access to your cPanel account
- Your domain name.
- The mail server information from your email provider (if you’re using Google Workspace, Zoho Mail, etc.).
Step 1: Log in to cPanel
- First, log in to your telaHosting Client Area using your registered email and password.
- From the dashboard, select your hosting account and click “Log in to cPanel” to access the dashboard.
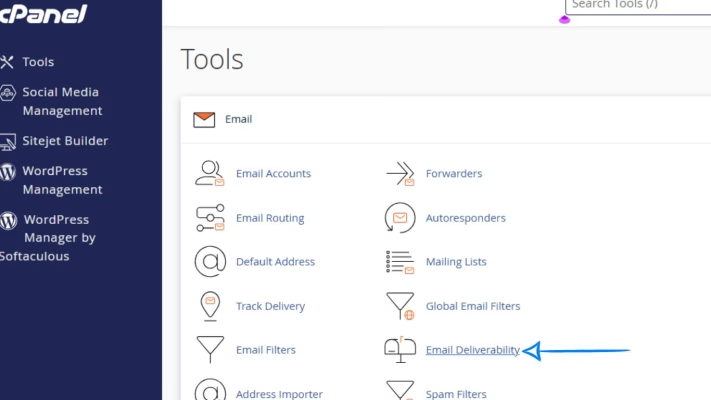
Step 2: Go to the Email Deliverability Tool
Once you’re inside cPanel, scroll down to the Email section and click on “Email Deliverability.”
This is where you can view and manage SPF, DKIM, and DMARC records for your domain. If there’s an issue with any of them, cPanel will show a warning beside your domain.
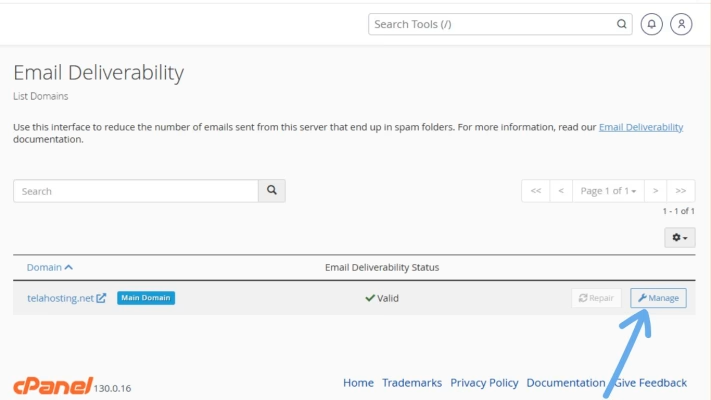
Setting Up SPF in cPanel
1. Find your domain name and click “Manage.”
2. Scroll down to the SPF section.
3. cPanel will automatically suggest a recommended SPF record. You’ll see something like this:
v=spf1 +a +mx +ip4:123.45.67.89 include:relay.mailserver.com ~all
Here’s what this means:
- v=spf1 → Identifies the SPF version.
- +a → Authorizes the domain’s A record (main IP).
- +mx → Allows mail servers listed in your MX records.
- ip4: → Authorizes a specific IP address to send emails.
- include: → Adds other mail services (like Google or Zoho).
- ~all → Means any server not listed is “not authorized.”
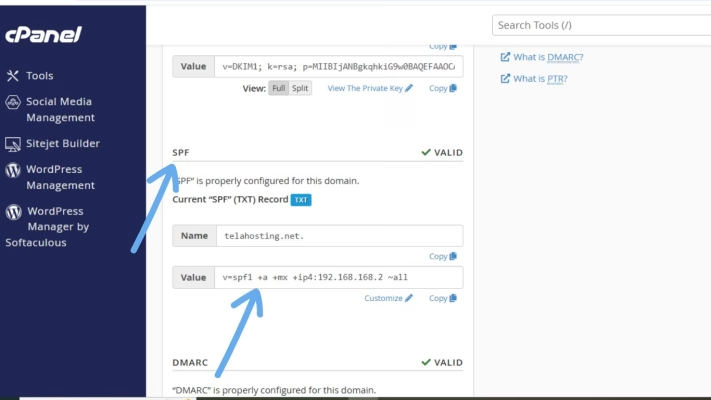
Once you’re happy with the setup, click “Install the Suggested Record.” Boom! Your SPF record is live.
Setting Up DKIM in cPanel
Still in the Email Deliverability page:
- Scroll down to the DKIM section.
- Click “Install the Suggested Record” or “Generate Local DKIM Key.”
cPanel will automatically create and install a DKIM record for your domain. It will look like this: default._domainkey.yourdomain.com
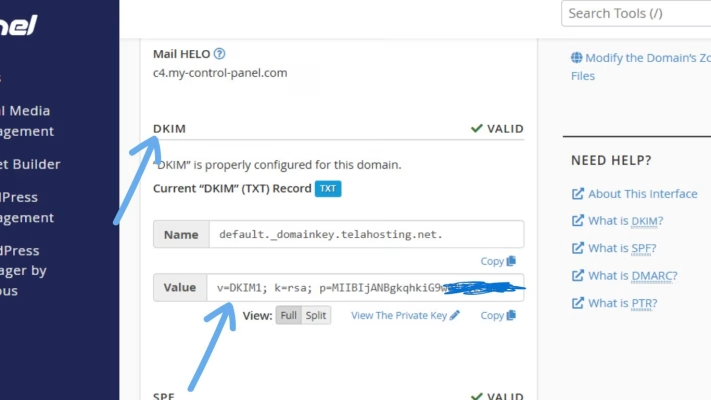
This record includes a long string of encrypted characters, that’s your digital signature key. Once installed, your outgoing emails will include a DKIM signature, allowing receiving mail servers to verify your authenticity.
Setting Up DMARC in cPanel
DMARC is not created automatically, so you’ll add it manually using the Zone Editor.
Here’s how:
1. Go back to your cPanel home.
2. Under Domains, click on “Zone Editor.”
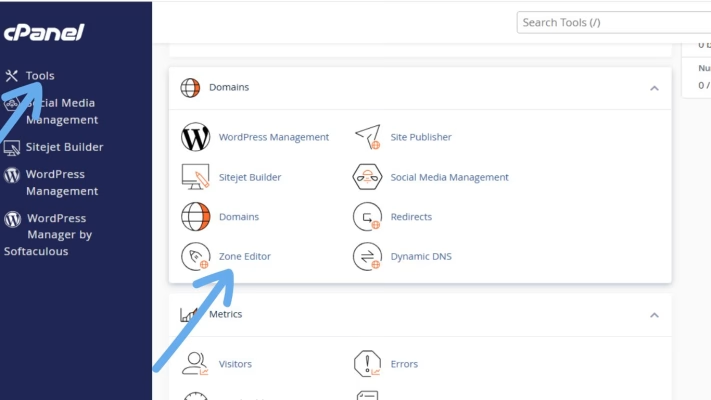
3. Find your domain and click “Manage.”

4. Click “+ Add Record” → choose TXT Record.
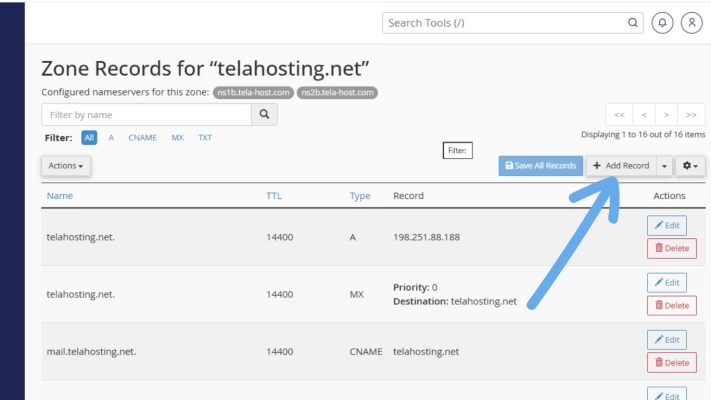
Now, fill in the fields as follows:
| Field | Example Value |
| Name | _dmarc.yourdomain.com |
| TTL | 14400 |
| Type | TXT |
| Record (Value) | v=DMARC1; p=none; rua=mailto:[email protected]; ruf=mailto:[email protected]; sp=none; aspf=r; |
Explanation:
- v=DMARC1 → Defines DMARC protocol.
- p=none → Just monitor (you can change to quarantine or reject later).
- rua= → Email address for aggregate reports.
- ruf= → Email address for detailed reports.
- sp=none → Same policy applies to subdomains.
- aspf=r → Relaxed SPF alignment mode.
Once done, click “Save Record.”
Step 6: Verify Your SPF, DKIM, and DMARC Records
After saving, your new records will start propagating across the internet. This can take a few minutes up to 24 hours. To verify if everything is working correctly, use any of these tools:
- DNSChecker.org: check if your records are live.
- MXToolbox.com: test SPF, DKIM, and DMARC configuration.
- Google Admin Toolbox: run a DNS lookup.
If all results show “PASS,” your domain is now fully authenticated!
Bonus Tip: Fine-Tuning DMARC for Better Security
Once your SPF and DKIM are stable, you can tighten your DMARC policy:
- Change p=none to p=quarantine (suspicious emails go to spam).
- Eventually, move to p=reject (unauthorized emails are fully blocked).
This ensures only legitimate emails from your domain get delivered — keeping your brand reputation spotless.
Final Thoughts
These three records SPF, DKIM and DMARC are your domain’s best defense against email fraud, spam, and delivery issues. And once they’re properly configured, your emails will reach inboxes faster, build trust, and reflect professionalism.
Need help? Our friendly support team is always here for you! Reach out below.
Happy hosting! 🌟