
What is Google Workspace?
Google Workspace is a collection of professional tools from Google that helps you run your business smoothly, especially when it comes to email, communication, storage, and online collaboration.
Instead of using a regular gmail.com email, Google Workspace allows you to use Gmail with your own domain, like:
How Google Workspace Email Works
Google Workspace allows you to use Gmail’s clean interface, strong spam protection, cloud storage, and professional business tools with your branded domain email. Instead of using @gmail.com, you’ll use @yourdomain.com while enjoying every feature Gmail offers.
To make this work, you must update your domain’s DNS records, specifically your MX, SPF, DKIM, and DMARC records, so Google can handle your incoming and outgoing emails. Once these settings are configured, all your emails will be routed through Google with better deliverability and stronger security.
What You’ll Need
- Your domain
- An active Google Workspace plan
- Access to your cPanel
- Access to the Google Admin Console
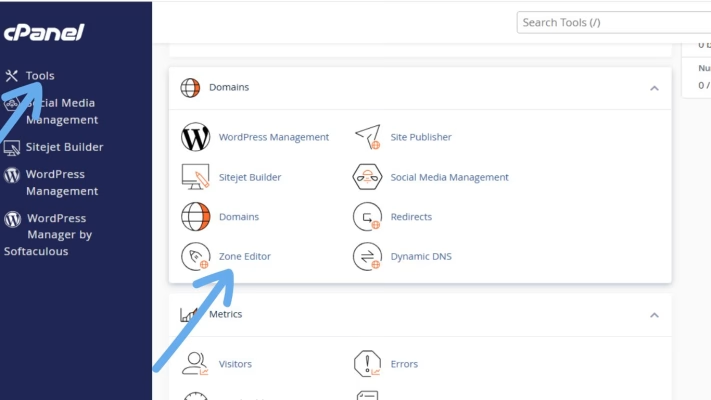
Step 1: Log in to cPanel
- To get started, log in to your cPanel, you can access cPanel directly from your client dashboard.
- Once you’re inside cPanel, scroll down until you see Domains. That’s where the tools you’ll need are located.
Step 2: Open the DNS Zone Editor
- Under the Domains section, click Zone Editor. This is where you manage all DNS settings for your domain.
- Find your domain and click Manage.
Step 3: Remove Old or Conflicting MX Records
Before adding Google’s MX records, you need to delete any existing MX records pointing to your hosting server or another mail provider. Because only one service can control your email at a time.
If you keep old MX records, your email may stop working or route to the wrong inbox. Delete everything except records you added manually for other services (but generally delete all MX records before adding Google’s).
Step 4: Add Google Workspace MX Records
Now, add Google’s MX records exactly as Google provides them.
| Priority | Mail Server |
| 1 | ASPMX.L.GOOGLE.COM |
| 5 | ALT1.ASPMX.L.GOOGLE.COM |
| 5 | ALT2.ASPMX.L.GOOGLE.COM |
| 10 | ALT3.ASPMX.L.GOOGLE.COM |
| 10 | ALT4.ASPMX.L.GOOGLE.COM |
To add them:
- Click Add Record
- Choose MX
- Enter your domain or “@”
- Add each server with its correct priority
- Save
Once you’re done, your domain is officially pointing to Google for email delivery.
Step 5: Add SPF Record (Required for Deliverability)
An SPF record tells other mail servers that Google is allowed to send emails on your behalf. Without it, your emails might end up in spam.
Add this SPF as a TXT record: v=spf1 include:_spf.google.com ~all
If you already have an SPF record, update it instead of creating a duplicate.
Step 6: Add DKIM Record
DKIM adds a digital signature to your outgoing emails to prove that they are legitimate and haven’t been tampered with. To set it up:
- Log in to Google Admin Console
- Go to Apps → Google Workspace → Gmail
- Click Authenticate Email
- Generate your DKIM key
- Copy the TXT record Google gives you
- Return to cPanel → Zone Editor → Add TXT Record and Paste the DKIM details and save.
This step significantly improves deliverability.
Step 7: Add DMARC Record
Add this basic DMARC record:
- Name: _dmarc
- Value: v=DMARC1; p=none; rua=mailto:[email protected]
This is the recommended starting point. You can make it stricter later.
Also ensure that you replace [email protected] with your real email domain.
Step 8: Verify Your Domain in Google Admin Console
Google Workspace requires you to verify that you own the domain. You’ll be given a TXT record during setup that looks something like this: google-site-verification=xxxxxxxxxxxxxxxx
Add it in cPanel → Zone Editor → Add TXT Record, Save it, return to Google Admin, and click Verify. Once verified, Google unlocks all your Workspace features.
Step 9: Test Your Email
To make sure everything works:
- Send an email from Gmail using your domain identity.
- Send an email to your domain email from another address.
- Check if messages deliver instantly.
- Use tools like MXToolbox to check DNS propagation.
If everything was set up correctly, your email will now send and receive using Google Workspace.
Common Issues and Fixes
- Email not receiving: Check MX priorities — they must match Google’s order exactly.
- Emails going to spam: Your SPF or DKIM is missing or incorrect.
- Domain not verifying: TXT verification record may be added wrongly (typo or wrong field).
- Slow propagation: DNS may take 5 minutes to 24 hours to update.
Conclusion
Setting up your domain email to work with Google Workspace through cPanel DNS is one of the best moves you can make for your business. It gives you a professional email identity, powerful Gmail features, and dependable communication.
FAQs
- How long does DNS propagation take?
Usually between 5 minutes and 24 hours. - Do I need hosting to use Google Workspace?
No. A domain is enough, but telaHosting hosting makes DNS management easier. - Why am I not receiving emails?
Your MX records may be incorrect or still propagating. - Can I use cPanel email and Google Workspace together?
No, you must choose one. Google Workspace requires exclusive MX records. - Does telaHosting support Google Workspace?
Yes — our support team can guide you through the setup anytime.
Need help? Our friendly support team is always here for you! Reach out below.
Happy hosting! 🌟