What Are MX Records?
MX records, short for Mail Exchange records, are special DNS settings that tell the internet where to deliver your emails. They are like a postal address for your domain’s email.
For example, if someone sends an email to [email protected], the MX record ensures that message gets delivered to the correct mail server. Without MX records, emails sent to your domain simply have nowhere to go, they’ll bounce back or get lost.
Why MX Records Matter for Your Custom Email
- Email Delivery: Without correct MX records, your emails won’t reach your inbox.
- Professionalism: Having [email protected] looks way more professional than a Gmail or Yahoo address.
- Reliability: Properly configured MX records prevent lost or delayed messages.
- Spam Reduction: Some mail services use MX verification to reduce spam and spoofing.
What You’ll Need
- Access to your cPanel (from your telaHosting dashboard).
- The MX record details from your email service provider.
- Your domain name
If you’re using telaHosting’s email service, you can find your MX details inside your hosting welcome email or client dashboard.
If you’re using a third-party service like Google Workspace, Zoho Mail, or Microsoft 365, they’ll provide the exact MX entries you need to use.
Step 1: Log in to Your cPanel
- Log in to your telaHosting Client Area using your registered email and password.
- From the dashboard, select your hosting account and click “Log in to cPanel” to access the dashboard
Step 2: Locate the “Zone Editor”
- Once inside cPanel, scroll down until you see the Domains section.
- Click on “Zone Editor.”
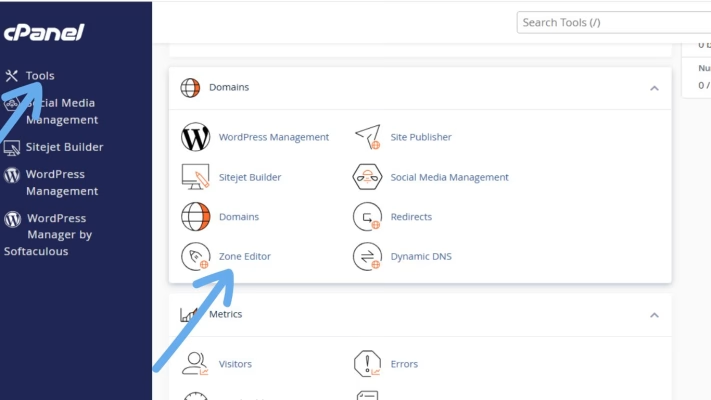
This is where all your DNS records (like A, CNAME, TXT, and MX) are managed.
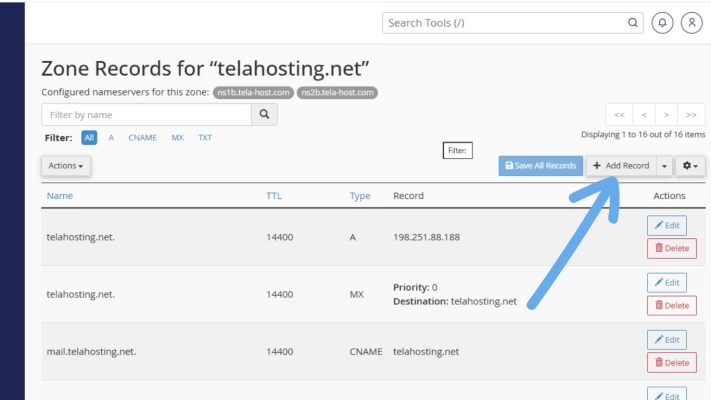
Step 3: Find Your Domain and Manage DNS Records
If you have multiple domains, you’ll see a list here. Find the domain you want to add an MX record for and click “Manage.”

You’ll now see all the DNS records connected to that domain.
Step 4: Add a New MX Record
Click “+ Add Record”, and from the dropdown, select MX Record.
You’ll need to fill in some fields:
- Name: Type your domain name (or leave it as “@” if cPanel auto-fills).
- TTL (Time To Live): Leave this as default (usually 14400 seconds).
- Priority: Enter the priority number provided by your email host (lower numbers mean higher priority).
- Destination: Enter the mail server address from your email provider.
Here’s an example setup:
| Field | Example Value |
| Name | @ |
| TTL | 14400 |
| Priority | 10 |
| Destination | mail.yourdomain.com |
If you’re using Google Workspace, your MX records will look like this:
| Priority | Destination |
| 1 | ASPMX.L.GOOGLE.COM |
| 5 | ALT1.ASPMX.L.GOOGLE.COM |
| 5 | ALT2.ASPMX.L.GOOGLE.COM |
| 10 | ALT3.ASPMX.L.GOOGLE.COM |
| 10 | ALT4.ASPMX.L.GOOGLE.COM |
After entering the details, click “Save Record.”
Step 5: Delete Any Old MX Records
If your domain already has old or default MX records, it’s a good idea to remove them to avoid conflicts. Simply click the “Delete” button next to any outdated MX records.
Your domain should now only have the correct mail records for your new email service.
Step 6: Wait for DNS Propagation
Once you’ve saved your new MX records, your changes will begin to spread across global DNS servers — a process known as DNS propagation.
This usually takes a few minutes to a few hours, but in some cases, it might take up to 24 hours. You can track the progress using a free online tool like DNSChecker.org. Just type your domain name, select “MX,” and click “Search.”
Step 7: Test Your Email Setup
Try sending a message from another account (like Gmail or Yahoo) to your new custom email — for example, [email protected].
If you receive it successfully, congratulations! Your MX records are working perfectly. If not, double-check the values you entered for typos or missing details.
Common Mistakes to Avoid When Adding MX Records
- Typing errors: in the mail server address (even one wrong character can cause issues).
- Wrong priority values: always follow your provider’s instructions.
- Not deleting old MX records: duplicates can confuse mail delivery.
- Missing trailing dot (.): some systems require a dot at the end of the mail server address (e.g., mail.yourdomain.com.).
Final Thoughts
Adding MX records in cPanel might sound technical at first, but once you understand the steps, it’s actually very easy. Just log into cPanel, open Zone Editor, add your MX records, and wait for them to propagate and you’re good to go.
Need help? Our friendly support team is always here for you! Reach out below.
Happy hosting! 🌟