If you’re setting up a custom email address for your domain — something professional like [email protected] — one of the most important steps is adding your MX records.
What Are MX Records and Why Do You Need Them
MX records (Mail Exchange records) tell the internet where to deliver your email. They’re like the address of your mailbox. When someone sends an email to you, their mail server looks at your domain’s MX records and asks:
“Where do I deliver this message?”
If your MX records are missing, wrong, or outdated, email will fail — even if your email hosting service is working fine.
Step 1: Log into Your DirctAdmin Control Panel
- Log in to your telaHosting Client Area
- Select your hosting services
- Click “Login to DirectAdmin”
This takes you straight to the control panel where your domain settings live.
Step 2: Open the DNS Management Section
Once DirectAdmin loads:
- Scroll down to Account Manager
- Click DNS Management
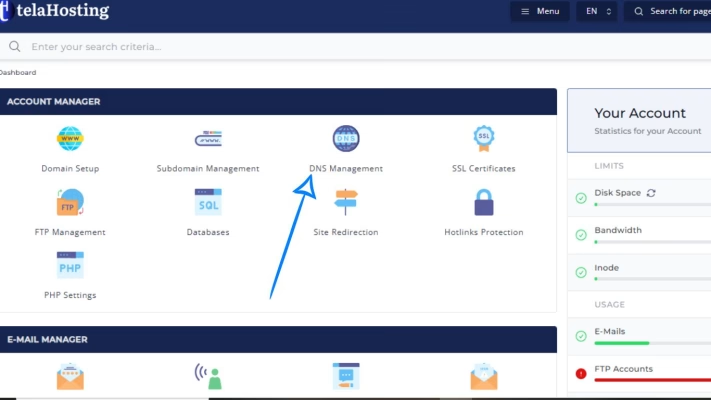
This is the page where all your DNS records — A, CNAME, MX, TXT — are listed.
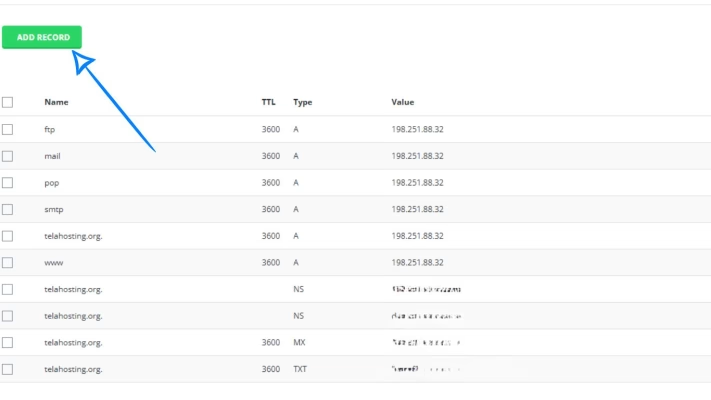
Step 3: Delete Old or Incorrect MX Records (If Any)
Before adding new MX records, you should remove any old ones that may conflict. Look for any existing MX records and check if they belong to the email provider you plan to use.
If not click Delete beside the unwanted MX record. This prevents email routing issues.
Step 4: Add Your New MX Record(s)
You’ll need two things from your email provider:
- The MX record value (e.g., mail.yourdomain.com or mx1.zoho.com)
- The priority number (e.g., 10, 20, or 30)
Here’s how to create an MX record:
1. Click Add Record
2. Select MX Record
3. In the Name field, enter: yourdomain.com (leave as it is if DirectAdmin fills it automatically)
4. Enter your MX value
5. Enter the priority number
6. Save the record
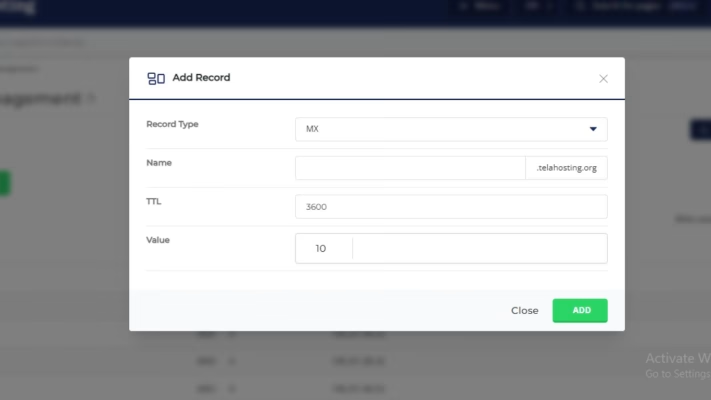
If your email provider gives you multiple MX records, repeat the steps for each record.
Step 5: Add Required A or CNAME Records (If Needed)
Some email providers require additional DNS records, such as:
- A record for mail.yourdomain.com
- SPF (TXT record)
- DKIM
- DMARC
For telaHosting email, you usually need:
- An A record pointing mail.yourdomain.com → your server IP
- MX record pointing to mail.yourdomain.com
If you’re using other providers like Google or Zoho, follow their specific instructions.
6. Save Your Changes and Allow DNS Propagation
After saving your new MX records, DNS needs time to update globally.
Propagation typically takes:
- 5 to 30 minutes and
- Up to 24 hours worldwide
During this period, email may behave unpredictably — this is normal.
How to Confirm Your MX Records Are Working
You can check your MX status using:
1. DNSChecker.org
- Enter your domain
- Select MX
- Click Search

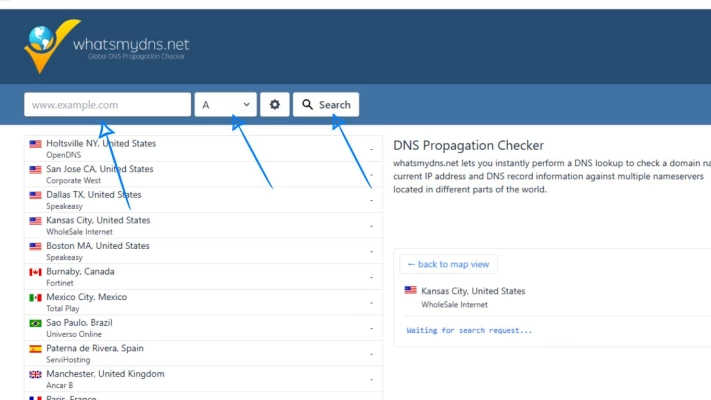
2. WhatsMyDNS.net
Same process — simple and quick.
Once the new MX record appears across several regions, your email should work properly.
Conclusion
Adding MX records in DirectAdmin is one of the most important steps for setting up your custom email. Whether you want to use telaHosting email or connect to services like Google or Zoho, the process is simple once you know where to click and what to enter.
FAQs
1. How long does MX record propagation take?
Usually a few minutes, but full global updates may take up to 24 hours.
2. Do MX records require priority numbers?
Yes — lower numbers have higher priority (10 is higher priority than 20).
3. Do I need SPF or DKIM?
Yes, especially for preventing your emails from going to spam.
4. What happens if MX records are wrong?
You won’t receive email at all, or messages may bounce.
5. Can I use telaHosting email and Google Workspace together?
No — only one email provider can control your MX records at a time.
Pingback: How to Fix Email Delivery Issues Caused by Incorrect MX Records in DirectAdmin - telaHosting
Pingback: How to Set Up Email Forwarding Using DNS in DirectAdmin - telaHosting