So, you’ve just updated your DNS settings, maybe you changed your A record, added a CNAME, or updated your MX records for email and now you’re waiting for everything to take effect. But here’s the thing: DNS changes don’t happen instantly. They take time to spread across the internet, a process known as DNS propagation.
What Is DNS Propagation?
When you make changes to your domain’s DNS—like pointing your domain to a new hosting server, those updates need to be shared with DNS servers around the world.
DNS propagation is the time it takes for those changes to fully update globally.
Typically, DNS propagation takes a few minutes to 48 hours, depending on factors like:
- Your domain’s TTL (Time-To-Live) setting.
- How often DNS servers refresh their cache.
- The location of the DNS servers worldwide.
Why It’s Important to Check DNS Propagation
Checking DNS propagation helps you:
- Verify your updates: to confirm your new records are live.
- Troubleshoot website or email issues: for example, if your website isn’t loading after a migration.
- Avoid downtime: by ensuring your records are pointing to the right server.
- Monitor progress: so you know when global updates are complete.
It’s a quick way to make sure your domain is correctly connected to your hosting — and that everything’s running smoothly.
What You’ll Need
To check DNS propagation, you’ll need to know:
- Your domain name (e.g., yourdomain.com).
- The type of DNS record you changed (A, CNAME, MX, TXT, NS, etc.).
- The expected value (for example, the new IP address or record value you added).
Step 1: Visit a DNS Propagation Checker Website
There are several free online tools that can check DNS status for you. Some of the most reliable ones include:
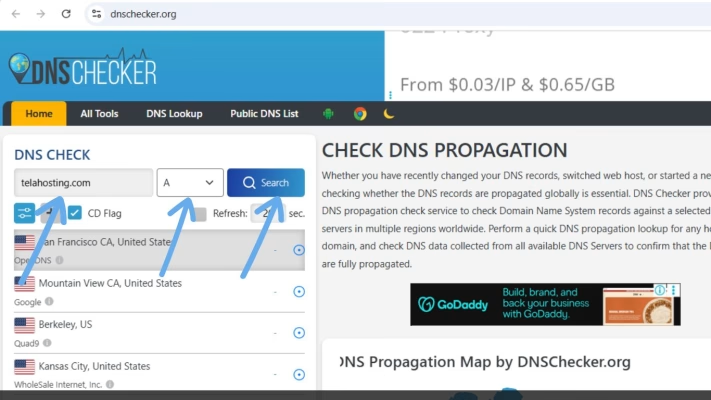
Step 2: Enter Your Domain Name
On the site, you’ll see a search box. Type your full domain name (like yourdomain.com) into the field. Next, you’ll need to choose the type of record you want to check. From the dropdown list, you can select:
- A Record: check your website’s IP address connection.
- CNAME Record: verifies subdomain redirects (like blog.yourdomain.com).
- MX Record: checks email routing.
- TXT Record: confirms verification records (e.g., Google or SPF).
- NS Record: checks your domain’s name servers.
Once you’ve selected the record type, click “Search” or “Check.”
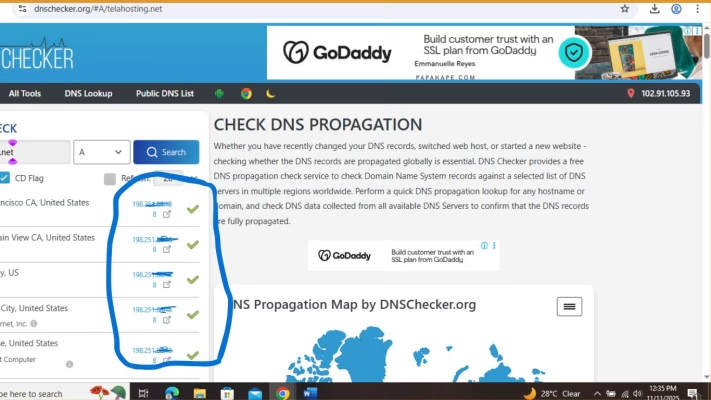
Step 3: View the Results
In just a few seconds, you’ll see a list of DNS servers from around the world—covering regions like Africa, Europe, Asia, and North America.
Each location will show whether it’s reading your new DNS record correctly.
- If the same new IP or record value appears everywhere, congratulations — your DNS has fully propagated!
- If some locations still show the old record, it means propagation is still in progress.
You can check again in a few hours until the updates appear worldwide.
Understanding the Results
When you check DNS propagation, you’ll notice different outcomes:
Fully Updated: All servers show the same new record. This means your DNS update is complete and live worldwide.
- Partially Updated: Some servers show the old value, while others show the new one. This is normal, it’s still propagating.
- Not Updated: All servers show the old record, meaning propagation hasn’t started yet or there’s an error in your DNS settings.
If your update hasn’t shown up after 24–48 hours, double-check:
- You entered the correct IP or value.
- The record type is correct.
- Your domain is using telaHosting’s name servers.
Tips to Speed Up DNS Propagation
While you can’t completely control DNS propagation time, there are a few things you can do to make it faster:
- Lower your TTL (Time-To-Live) before making changes: this tells DNS servers to refresh records more frequently.
- Clear your local DNS cache: on your computer or browser.
- Flush your ISP cache: by restarting your modem or router.
- Use telaHosting’s fast DNS servers: we’ve optimized them for quicker global updates.
How to Clear Your Local DNS Cache
If your new DNS changes don’t seem to appear even after propagation, your local device may still be storing old DNS data. Here’s how to clear it:
- Windows:
- Open Command Prompt (as Administrator).
- Type:
- ipconfig /flushdns
- Press Enter.
- Mac:
- Open Terminal.
- Type:
- sudo dscacheutil -flushcache; sudo killall -HUP mDNSResponder
- Enter your password when prompted.
This forces your computer to fetch the latest DNS records immediately.
Final Thoughts
Checking your DNS propagation and status online is one of those small but powerful habits every website owner should learn. It helps you confirm your domain is pointing where it should, saves time troubleshooting, and ensures your website or emails work flawlessly.
Pingback: How to Verify Your Domain on Meta (Facebook & Instagram) Using DirectAdmin - telaHosting