At telaHosting, installing WordPress via Softaculous is a seamless, one-click process that automates the entire setup. This guide is designed for our cPanel hosting customers. Softaculous comes pre-installed on all our plans. Whether you’re starting a blog, business site, or e-commerce store, you’ll be up and running in 5 minutes or less.
Step-by-Step Guide on How to Install WP via Softaculous
Step 1: Log in to Your cPanel Account
- First, log in to your telaHosting Client Area using your registered email and password.
- From the dashboard, select your hosting account and click “Log in to cPanel” to access the dashboard.
Step 2: Locate and Open Softaculous Apps Installer
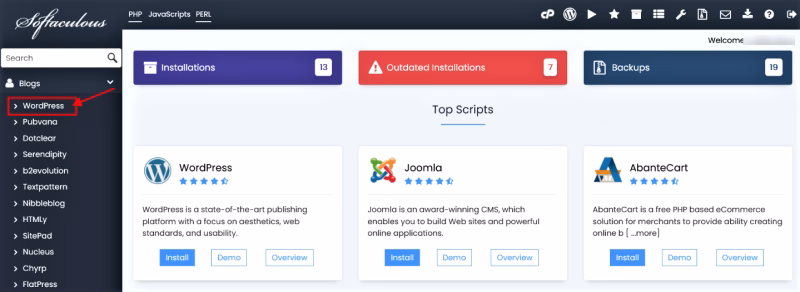
- In cPanel, scroll to the Software section.
- Click the Softaculous Apps Installer icon to launch the dashboard, featuring hundreds of apps including WordPress. Our plans include free Softaculous for effortless installs.
Step 3: Find and Select WordPress
- In Softaculous, use the top search bar to type “WordPress” or navigate to the Blogs category in the left sidebar.
- Click the WordPress logo or tile to open its details page, complete with ratings and requirements.
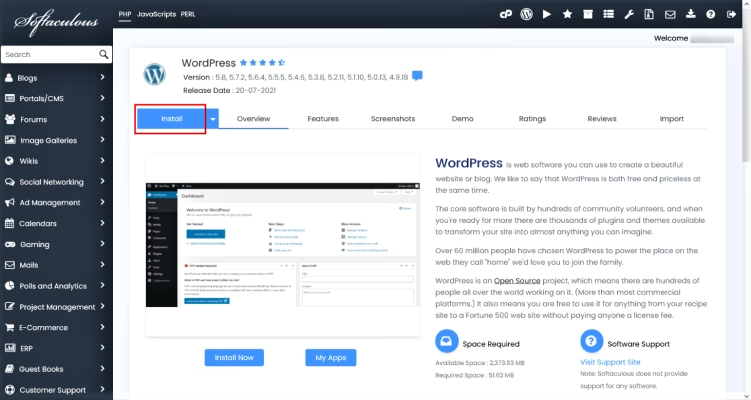
Step 4: Start the Installation
- On the WordPress details page, click the prominent Install button (top-right) to begin the wizard.
Step 5: Configure the Installation Settings
- Choose Installation URL:
- Select the Protocol (
https://is recommended for security; usehttp://otherwise). - Choose your Domain from the dropdown.
- Leave In Directory blank for root installation (e.g., yourdomain.com) or enter a subfolder like “blog” for a subdirectory setup.
- Select the Protocol (
- Site Settings:
- Enter a Site Name (e.g., “My telaHosted Site”).
- Add a Site Description (optional, e.g., “Powered by telaHosting”).
- Admin Account:
- Choose a secure Admin Username (avoid “admin”).
- Generate a strong Admin Password using Softaculous’ tool.
- Provide your Admin Email for alerts and recovery. For email setup, see How to Create a Professional Email Account in cPanel.
- Advanced Options (optional; defaults work great for telaHosting users):
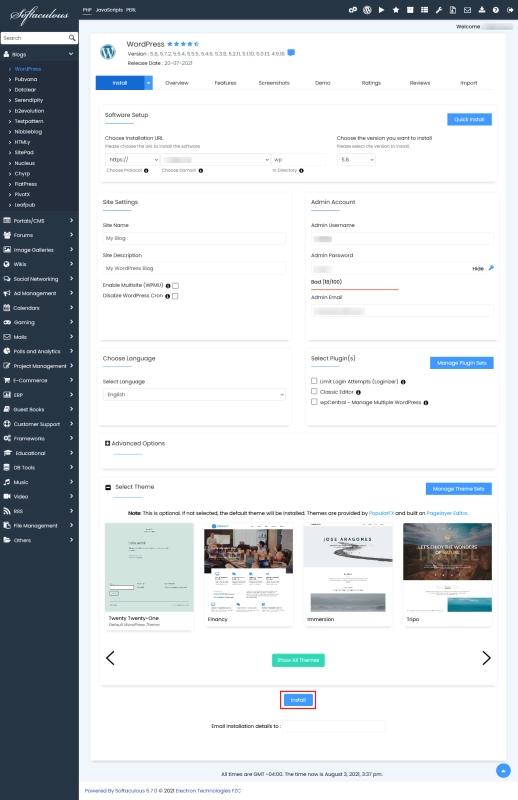
- Keep Database Name and Table Prefix auto-generated (e.g., “wp_”). For database management, refer to How to Import and Export a Database via phpMyAdmin.
- Enable auto-updates and select your preferred language or theme.
- Double-check the summary panel on the right for accuracy.
Step 6: Complete the Installation
- Click the Install button at the bottom to proceed.
- Softaculous handles the download and configuration automatically (1-2 minutes). Watch the progress bar, then celebrate with the success screen showing your site URL and login credentials.
Step 7: Access Your WordPress Site
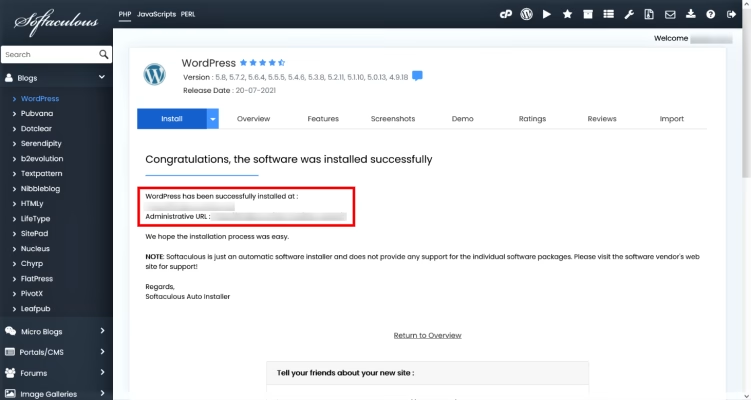
- Preview your new site by visiting your domain (e.g.,
https://yourdomain.com). - Log in to the WordPress dashboard at
https://yourdomain.com/wp-adminusing your admin details. - Start customizing: Add themes, plugins, and content. For transferring an existing site, check How to Move/Migrate a WordPress Site From One Host to Another.
Tips and Troubleshooting
- Security First: Update your admin password right away and install a plugin like Wordfence for two-factor authentication. For backups, see How to Create and Restore Backups in cPanel.
- Installation Issues?: Verify disk space, MySQL access, and PHP 7.4+ (we recommend 8.0+ on telaHosting). Use How to Upload a Static Website to cPanel via File Manager for checks, or contact our 24/7 support.
- Stay Updated: Use Softaculous for one-click updates to WordPress core, themes, and plugins. For FTP access during tweaks, see How to Create an FTP Account in cPanel and DirectAdmin.
Congratulations! your WordPress site is live on telaHosting’s fast servers! For more tutorials, explore our knowledgebase.
Need help? Our friendly support team is always here for you! Reach out below.
Happy hosting! 🌟