
Connecting your domain from telaHosting to Cloudflare helps you manage DNS easily, improve website speed, and add extra security. Follow these simple steps to complete the setup.
What You’ll Need
- Your telaHosting client area login.
- A Cloudflare account (you can create one at cloudflare.com).
- The Cloudflare nameservers assigned to your domain (Cloudflare provides these automatically).
Step 1: Log in to Your telaHosting Account
- Go to https://my.telahosting.com/login.
- Enter your credentials.
- Once inside, click on Domains → My Domains.
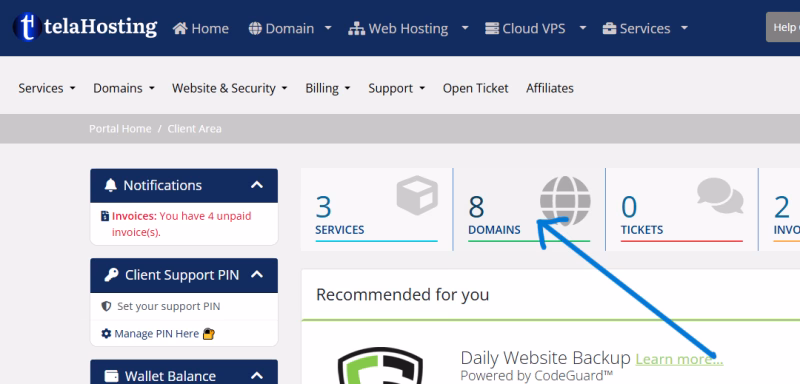
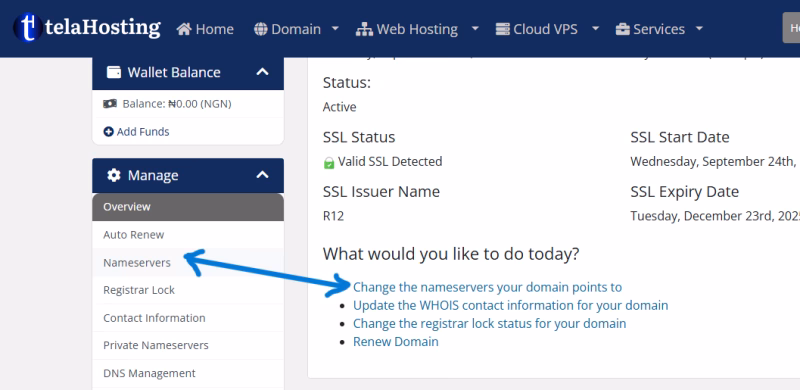
Step 2: Open Your Domain Settings
- Locate the domain you want to connect to Cloudflare.
- Click Manage Domain Section next to it.
- From the left-hand menu, click Nameservers or Change the nameservers your domain points to.
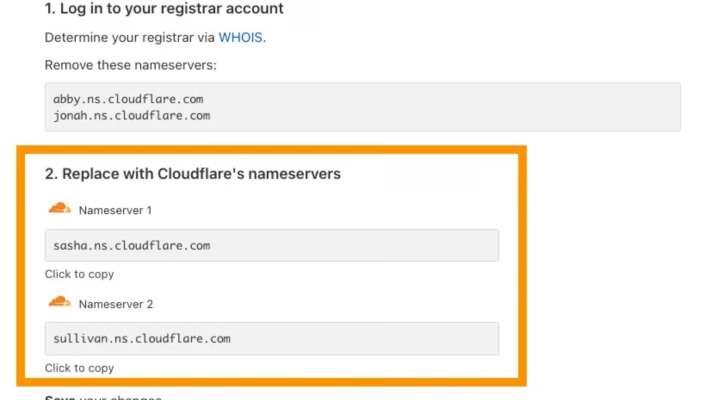
Step 3: Get Your Cloudflare Nameservers
- In your Cloudflare dashboard, click Add a Site.
- Enter your domain name (e.g.,
mybusiness.com) and click Continue. - Cloudflare will scan your DNS records, then show you two nameservers (e.g.
gabe.ns.cloudflare.comandmelissa.ns.cloudflare.com). - Copy them exactly.
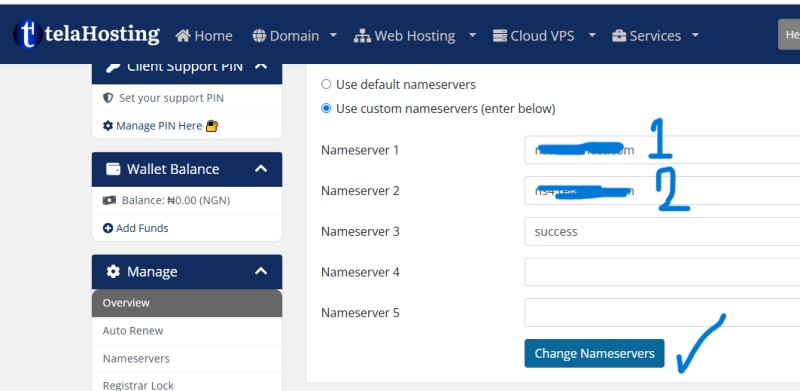
Step 4: Replace Nameservers in telaHosting
- Go back to your telaHosting domain settings.
- Under Nameserver Type, choose Use Custom Nameservers.
- Paste in both Cloudflare nameservers.
- Click Save Changes.
Step 5: Wait for Propagation
Once saved, your domain will start pointing to Cloudflare. Propagation may take a few minutes to 24 hours, depending on your domain extension (.ng, .com, etc.). Cloudflare will email you once the setup is complete.
Step 6: Setup DNS Records on Cloudflare
- Log back in to Cloudflare.
- Your domain status should now show Active.
- Open the DNS tab in Cloudflare and make sure all your important records (A, CNAME, MX, TXT, etc.) are present.
- For email (MX records), make sure the orange cloud icon is off (set to DNS-only).
- You can also make DNS changes here if you wish to update or remove some records.
- Click on the Edit under the Action section to Edit any DNS record.
- To add more record, click on the ADD RECORD button.
Step 7: Enable SSL and Security
- In Cloudflare, go to SSL/TLS → Overview.
- Set SSL mode to Full (strict) for maximum security.
- Optionally, turn on Always Use HTTPS under the “Edge Certificates” section.
Step 8: Test Your Website
- Visit your domain in a browser (e.g.,
https://mybusiness.com). - If your site loads normally and shows a secure connection, the setup is complete.
- If something doesn’t work (e.g., email), double-check your Cloudflare DNS records against your original telaHosting DNS zone.
Troubleshooting Tips
| Problem | Cause | Fix |
|---|---|---|
| Website not loading | Wrong A or CNAME record | Re-check your hosting IP in Cloudflare DNS |
| Email stopped working | MX record proxied or missing | Set MX record to DNS only (grey cloud) |
| Still “Pending” in Cloudflare | Nameservers not fully updated | Wait up to 48 hours or verify nameservers in WHOIS |
Done!
Your domain is now successfully pointed from telaHosting to Cloudflare. You can now manage DNS, SSL, and security directly from Cloudflare while keeping your registration with telaHosting.
Need help? Our friendly support team is always here for you! Reach out below.
Happy hosting! 🌟