Sometimes your DNS zone becomes messy — maybe you added too many records, something stopped working, emails are failing, or your website refuses to load after changing DNS. When things get confusing, the cleanest and fastest solution is to reset your DNS zone back to default.
What Does “Reset DNS Zone to Default” Mean?
When you reset your DNS zone, cPanel removes all your custom DNS configurations and restores the default records created by your hosting account. These default DNS records include:
- Default A-records
- Default MX records
- Default CNAME records
- Default TXT/SPF records
- Default NS records
- Default AutoSSL verification records
In simpler terms, your domain returns to the exact DNS setup it had when you first hosted it on telaHosting.
This is useful when things are broken and you just want to start fresh.
When Should You Reset Your DNS Zone?
You should reset your DNS zone if:
- Your site stopped loading due to wrong DNS edits
- Emails are bouncing or not delivering
- You mistakenly deleted important DNS records
- You moved hosting and want the new default records
- You have conflicting DNS entries
- SSL stopped issuing because DNS is incorrect
- Third-party apps gave you wrong values
- You want a clean DNS slate before reconfiguring
Resetting gives you a fresh start — clean, stable, and reliable.
Important Warning Before Resetting
Resetting DNS will remove all custom DNS entries, including:
- Custom A-records
- Google Workspace records
- Microsoft 365 records
- Custom email service MX records
- CNAMEs for Subdomains
- TXT records (DKIM, SPF, DMARC, etc.)
- Apps like Mailchimp, SendGrid, Zoho, Cloudflare, Shopify, Notion, etc.
So before resetting, ask yourself: “Do I need to save any DNS values first?” If yes, copy them somewhere safe.
Once you’re ready, let’s begin.
Step 1: Log in to Your telaHosting cPanel
- First, log in to your telaHosting Client Area using your registered email and password.
- From the dashboard, select your hosting account and click “Log in to cPanel” to access the dashboard.
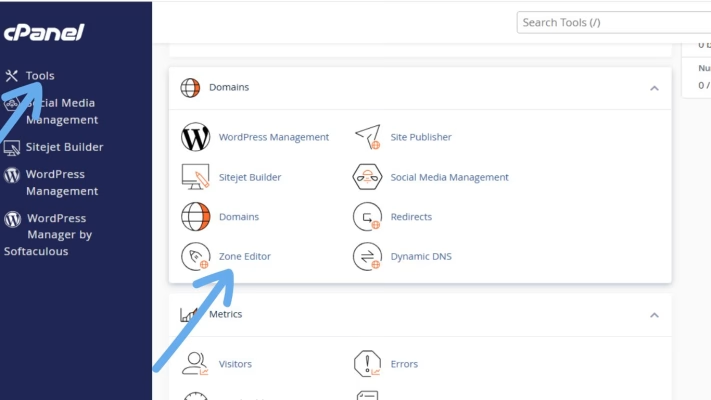
Step 2: Go to the Zone Editor
- Scroll down to the Domains
- Click on “Zone Editor.”: This is where you can manage all your DNS records — A, MX, TXT, and CNAME — for your domain.
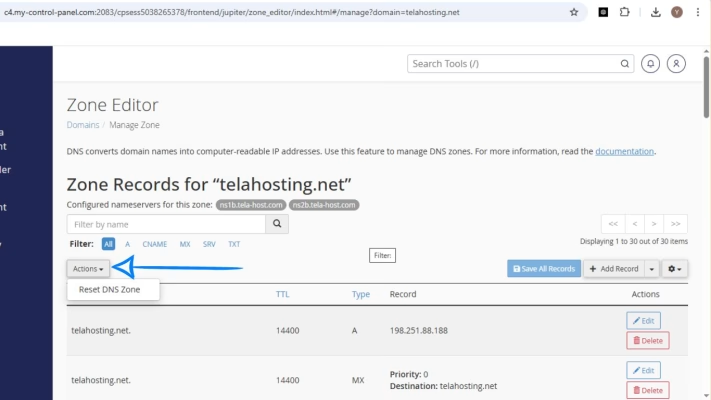
Step 3: Click “Manage” on the Domain You Want to Reset

This opens all DNS records for that domain. You’ll now see A, CNAME, MX, TXT, SRV, and other DNS entries.
Step 4: Use the “Reset Zone” Option
- Look for “Actions menu”.
- Click on Reset DNS Zone
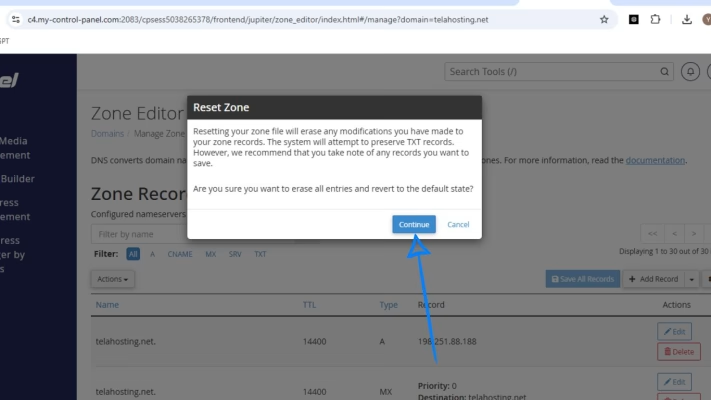
Step 5: Confirm the Reset
- A popup will appear, asking you to confirm.
- Click: Continue
cPanel will now:
- Remove all custom DNS records
- Rebuild the default DNS zone
- Generate new default records based on telaHosting server configuration
This usually takes 2–5 seconds.
Step 6: Allow the DNS to Rebuild and Propagate
After resetting, DNS changes need time to apply globally. Usually 5 minutes to 24 hours globally
During this time:
- Your site may load on/off
- Email might briefly delay
- SSL may re-issue automatically
After a short while, everything stabilizes.
What Happens After Resetting the DNS?
Your domain will now work based on telaHosting’s default server setup:
- Website will point to your hosting server
- Emails will route through your cPanel mail server
- Auto SSL will start working again
- All default subdomains will function
- DNS becomes clean and error-free
If you need to reconnect external services (Google Workspace, Cloudflare, etc.), you can re-add those records afterward.
How to Know if Reset Was Successful
Check these:
- Website Loads Normally: Your domain should show your hosted website again.
- Emails Start Delivering: MX records revert to cPanel mail.
- SSL Auto-Renews: Auto SSL validates correctly through DNS.
- DNS Checker Shows Default IP: Use tools like:
You should see the telaHosting server IP on your A-record.
Tips to Avoid DNS Issues in the Future
To keep your DNS stable:
- Always copy DNS records before editing
- Avoid deleting essential A-records
- Never mix Cloudflare DNS with cPanel DNS
- Don’t add conflicting records for the same hostname
- Use the correct MX priority for email services
- Keep SPF records in one line
- Don’t add multiple DKIM entries unless required
Conclusion
Resetting your DNS zone to default in cPanel is one of the fastest and easiest ways to fix broken DNS settings. Whether your website is down, email isn’t working, or you simply want a clean start, this one-button reset can save you hours of frustration.
And because we uses optimized DNS configurations, restoring your DNS zone ensures your site, emails, and server connections work smoothly again.
FAQs
1. Will resetting DNS delete my website?
No. Only DNS records are reset. Your website files stay safe.
2. Will my email stop working?
Only temporarily if the service uses custom MX records. Default cPanel email will work instantly.
3. Can I undo a DNS reset?
Not automatically — always back up DNS before resetting.
4. Do I need technical knowledge to reset DNS?
No. It’s a simple one-click action.
Need help? Our friendly support team is always here for you! Reach out below.
Happy hosting! 🌟