What Is Email Forwarding?
Email forwarding is a feature that automatically redirects incoming mail from one email address to another. For example, if someone sends a message to [email protected], it can automatically forward to [email protected].
It’s especially useful for:
- Business owners who want all team messages in one inbox.
- Freelancers managing multiple domains.
- Small businesses that don’t want to pay for multiple inboxes.
When set up properly, you’ll never miss important emails again — everything gets delivered right where you want it.
Why Use DNS for Email Forwarding?
- cPanel Forwarding: Works perfectly if your domain and email are hosted on the same server.
- DNS-Based Forwarding: Needed when your email forwarding is handled by another mail provider or service (like ImprovMX, Google Workspace, or Zoho Mail).
By adding the right DNS records, you’re telling the internet where to send your emails — ensuring smooth delivery and no interruptions.
What You’ll Need
- Access to your cPanel account
- Your domain name
- The DNS record details provided by your forwarding email service (if using a third-party provider).
Step 1: Log in to Your cPanel
- First, log in to your telaHosting Client Area using your registered email and password.
- From the dashboard, select your hosting account and click “Log in to cPanel” to access the dashboard.
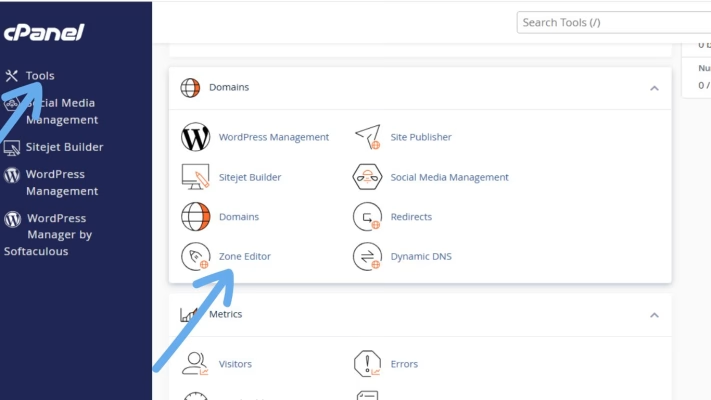
Step 2: Open the Zone Editor
- Scroll down to the Domains
- Click on “Zone Editor.”: This is where you can manage all your DNS records — A, MX, TXT, and CNAME — for your domain.
- If you have more than one domain, find the one you want to set up forwarding for and click “Manage.”
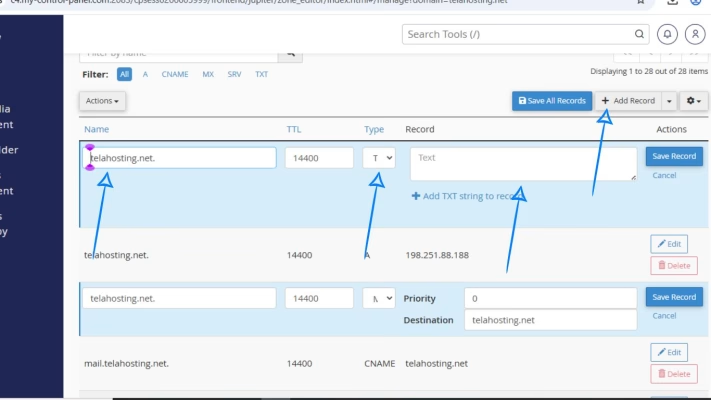
Step 3: Add or Update MX Records for Forwarding
To enable email forwarding through DNS, you need to configure the MX (Mail Exchange) records properly. If you’re using a third-party forwarding service (like ImprovMX), they’ll give you specific MX records to add.
Here’s an example of what they might look like:
| Priority | Destination |
| 10 | mx1.improvmx.com |
| 20 | mx2.improvmx.com |
To add them:
- Click “+ Add Record.”
- Choose MX Record from the dropdown.
- Enter your domain (or “@” as the name).
- Fill in the priority and destination fields.
- Click “Save Record.”

If there are existing MX records for another mail server (like your hosting mail), delete them first — you only need the ones for your forwarding service.
Step 4: Add the SPF Record (Optional but Recommended)
To ensure that your forwarded emails don’t end up in spam, you need to authorize your new mail servers using SPF (Sender Policy Framework).
Here’s how:
- Click “+ Add Record.”
- Choose TXT Record.
- Under Name, enter your domain name or “@”.
- Under Record, paste the SPF record given by your email forwarding provider. For example: v=spf1 include:spf.improvmx.com ~all. This tells receiving mail servers that ImprovMX (or whichever service you’re using) is authorized to send mail on your behalf.
- Click “Save Record.”
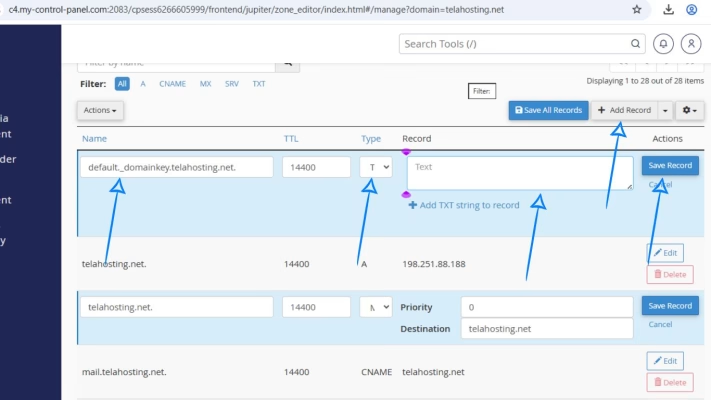
Step 5: Add the DKIM Record (Optional but Strongly Recommended)
Next, you can add a DKIM record to authenticate your forwarded emails and prevent spoofing.
- Click “+ Add Record.”
- Choose TXT Record.
- For Name, enter the value provided by your mail service (e.g., default._domainkey).
- Paste the DKIM value in the Record field (this is usually a long string of text).
- Click “Save Record.”
This ensures your emails are signed digitally, so recipients can confirm they came from you.
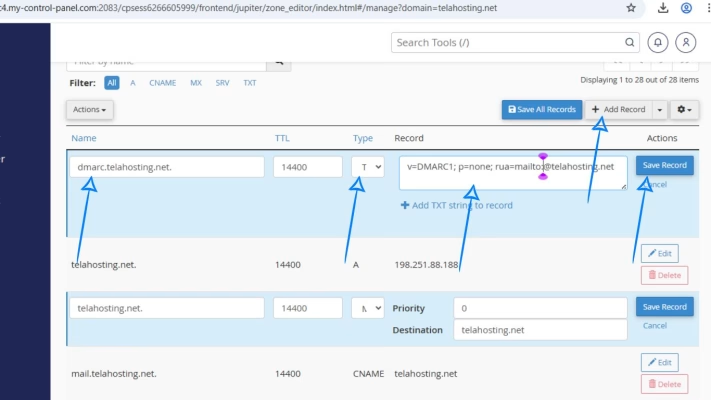
Step 6: Add a DMARC Record (Extra Layer of Protection)
To finalize your email forwarding setup, you can also add a DMARC record. This tells mail servers what to do if an email claiming to be from your domain fails SPF or DKIM checks.
- Click “+ Add Record.”
- Choose TXT Record.
- For Name, enter _dmarc.
- In the Record field, paste: v=DMARC1; p=none; rua=mailto:[email protected]. You can change p=none to p=quarantine or p=reject later if you want stricter protection.
- Click “Save Record.”
Step 7: Wait for DNS Propagation
After adding your MX, SPF, DKIM, and DMARC records, give it some time to propagate across the internet. This process can take anywhere between a few minutes to 24 hours.
To check if your DNS changes have gone live, visit DNSChecker.org, enter your domain, and check the MX, TXT, or CNAME records.
Step 8: Test Your Email Forwarding
Send an email to your domain-based address (e.g., [email protected]) and see if it arrives in the inbox you set for forwarding (e.g., [email protected]).
If it arrives successfully, congratulations! You’ve set up email forwarding correctly. If it doesn’t, double-check your MX and TXT records for any typos.
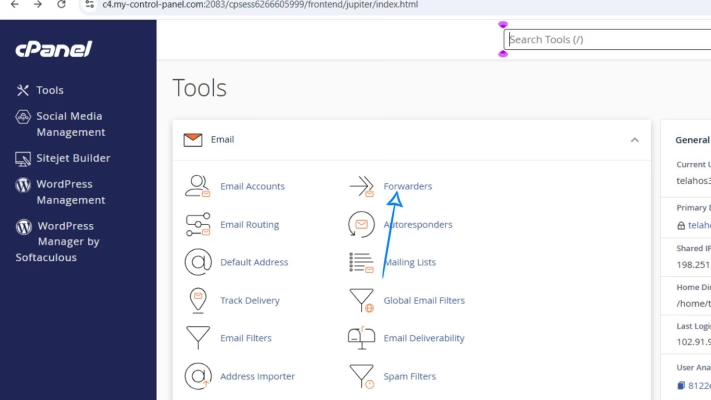
How to Set Up Email Forwarding Directly in cPanel
If your domain’s mail is hosted directly with telaHosting, you can set up email forwarding even faster without DNS changes.
1. Go to Email → Forwarders in cPanel.
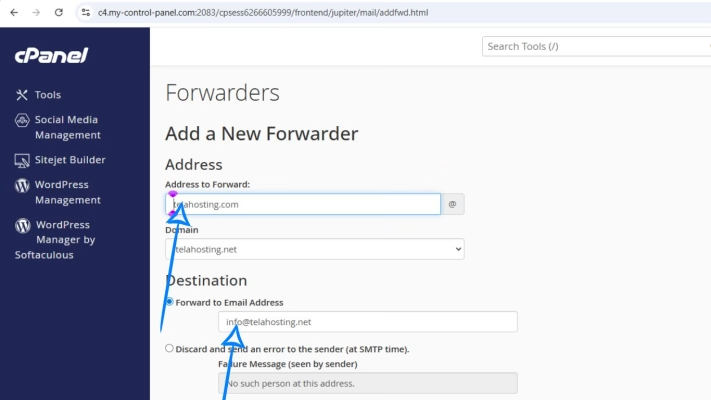
2. Click “Add Forwarder.”

3. Enter the address you want to forward (e.g., [email protected]).
4. Enter the destination address (e.g., [email protected]).
5. Click “Add Forwarder.”
That’s it! From now on, all emails sent to your domain address will automatically be redirected to your chosen inbox.
Final Thoughts
By correctly configuring your MX, SPF, DKIM, and DMARC records, you ensure that your domain forwards emails reliably and securely — without losing credibility or deliverability.
Need help? Our friendly support team is always here for you! Reach out below.
Happy hosting! 🌟