Updating your DNS records shouldn’t break your website, emails, or any of your services. And honestly, downtime is one thing no business wants — even a few minutes can affect sales, contacts, or trust.
Why DNS Updates Cause Downtime
Downtime usually happens when:
- A DNS record is deleted too early
- A wrong record is added
- DNS is changed before the new server is ready
- Duplicate or conflicting records exist
- Propagation hasn’t fully completed
The trick is to prepare first, update correctly, and only switch traffic when you’re sure everything works.
Step 1: Gather the New DNS Values First
Before touching anything in cPanel, make sure you have the new DNS details ready. That could be:
- A new A-record IP address
- A new CNAME value
- New MX records for email
- Updated TXT records
- New SRV details
Make sure everything is complete. This step alone prevents 90% of downtime.
Step 2: Log in to Your telaHosting cPanel
To start, log in to your cPanel account. You can do this through:
- The direct URL provided by us at telaHosting (something like yourdomain.com/cpanel), or
- Through your telaHosting Client Area using your registered email and password then click on “log in to cPanel” next to your hosting account.
- Once you’re in, scroll to the Domains section and select Zone Editor → Manage
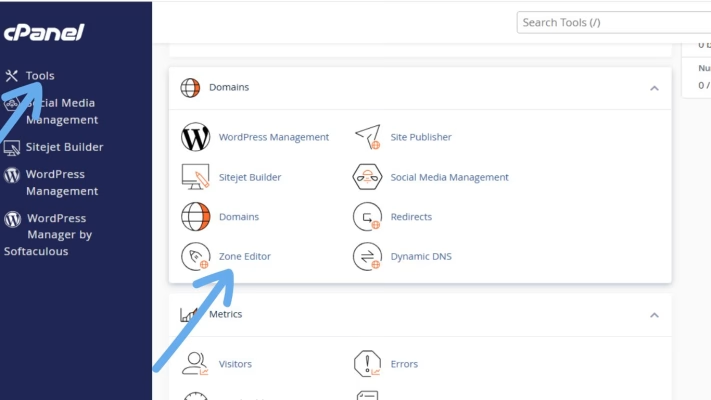
That is where all your DNS records live.
Step 3: Add New DNS Records Without Deleting the Old Ones
This is the most important rule if you want zero downtime. Don’t remove the existing records yet. Here’s what to do instead:
- If you’re updating an A-record: Add the new A-record with the same name, but keep the old one temporarily.
- If you’re updating a CNAME: Add the new one, but do NOT delete old one yet.
- If you’re updating MX records: Add the new MX records first — leave the old ones untouched for now.
- If you’re updating TXT (SPF, DKIM, etc.): Add the new TXT record and keep the old record until everything is confirmed working.
Because DNS propagation takes time, and during this period, some users will still reach the old server while others reach the new one. Keeping both allows everyone to stay connected.
Step 4: Lower the TTL (Optional but Powerful)
TTL means Time To Live: how long servers should cache your DNS. If you lower TTL before updating DNS, changes propagate faster.
Recommended TTL: 300 seconds (5 minutes). This step helps speed up the switch, but it’s optional.
Step 5: Test the New Server or Service Before Final Switch
Once you’ve added the new DNS record:
- Try opening the new server’s IP directly
- Use a temporary link if provided
- Test email sending/receiving if updating MX
- Check SSL on the new server
You want to confirm the new service is working before redirecting all traffic.
Step 6: Monitor DNS Propagation
Use any of the following tools:
Enter your domain and select the specific DNS record you updated (A, MX, CNAME, etc.). You should begin seeing updates gradually.
As long as both the old and new records exist, no downtime will occur.
Step 7: Remove Old DNS Records Only After Propagation
Once the propagation shows worldwide updates and everything works correctly, you can delete the old record(s).
This is the final cleanup step. Doing it earlier causes downtime, but doing it last ensures a smooth transition.
Best Practices to Avoid Downtime Completely
- Always add new DNS before removing old ones
- Never edit a live record directly — create a new one first
- Lower TTL before big changes
- Test everything before deleting anything
- Avoid multiple conflicting A or CNAME records
- Ensure SSL is active on the new server
- Wait for full propagation before removing old DNS
Common Mistakes to Avoid
- Deleting the old A-record before adding the new one: This causes instant downtime.
- Updating MX records without enabling email on the new service: Emails will bounce.
- Adding wrong IP or hostname: Your site becomes unreachable.
- Having both A and CNAME for the same name: This breaks DNS.
- Not waiting for propagation: Some users see the site, others don’t.
Conclusion
Updating DNS doesn’t have to cause downtime, not even for a few minutes. As long as you add new records first, test everything carefully, and only remove old records after propagation, your services will stay live and stable throughout the entire process.
Whether you’re switching hosting providers, moving emails, or connecting to a new app, this step-by-step method keeps your website running without interruption.
FAQs
1. How long does DNS propagation take?
5 minutes to 24 hour.
2. Can I update DNS without affecting my email?
Yes — just don’t delete or modify MX records until the new service is ready.
3. Do I need to lower TTL?
Not required, but it speeds up the transition.
4. What happens if I add wrong DNS?
You can easily delete it. The old one still works until propagation completes.
5. Will telaHosting help me with DNS migration?
Absolutely — our support team can handle everything for you.
Need help? Our friendly support team is always here for you! Reach out below.
Happy hosting! 🌟