What Causes DNS Downtime?
Downtime usually happens when:
- Old DNS records are deleted before new ones are active
- TTL values are too high
- MX records are changed incorrectly
- Nameservers are switched without preparation
- Changes are rushed without verification
DNS itself doesn’t “break” — mistakes do. And we’re going to avoid them.
The Golden Rule of Zero-Downtime DNS Updates
- Add new records first.
- Verify they work.
- Then remove old records.
What You Need Before You Start
- Access to DirectAdmin on telaHosting
- The new DNS values (IP, MX, TXT, etc.)
- A few minutes of patience
- A DNS checker tool
Once you have these, you’re ready.
Step 1: Reduce TTL Before Making Changes
TTL (Time To Live) controls how long DNS data is cached. If TTL is high, old records stick around longer — causing delays and confusion.
How to Lower TTL in DirectAdmin
- Log in to DirectAdmin
- Go to Account Manager → DNS Management
- Click Edit on the record you want to change
- Set TTL to something low, like: 300 (5 minutes)
Do this at least 30 minutes before making major changes.
Step 2: Add New DNS Records
Whether you’re changing:
- A records (website IP)
- MX records (email routing)
- TXT records (SPF, DKIM, verification)
- CNAME records
Add the new records first.
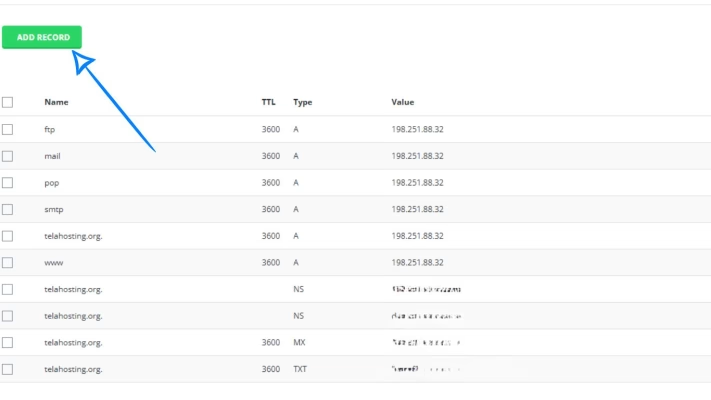
Example: If you’re moving to a new server:
- Keep the old A record
- Add a second A record with the new IP
Both can exist temporarily.
Step 3: Test the New Server or Service Before Final Switch
Once you’ve added the new DNS record:
- Try opening the new server’s IP directly
- Use a temporary link if provided
- Test email sending/receiving if updating MX
- Check SSL on the new server
You want to confirm the new service is working before redirecting all traffic.
Step 4: Monitor DNS Propagation
Before removing anything, test the new records. You can use:
Enter your domain and select the specific DNS record you updated (A, MX, CNAME, etc.). You should begin seeing updates gradually.
Check that:
- The new IP responds
- The new mail server receives email
- SPF/DKIM resolve correctly
This step is what prevents downtime.
Step 5: Gradually Remove Old Records
Once you confirm the new setup works:
- Go back to DNS Management
- Delete the old DNS record
- Save changes
Because TTL is low, users will switch over quickly.
Best Practices to Avoid Downtime Completely
- Always add new DNS before removing old ones
- Never edit a live record directly — create a new one first
- Lower TTL before big changes
- Test everything before deleting anything
- Avoid multiple conflicting A or CNAME records
- Ensure SSL is active on the new server
- Wait for full propagation before removing old DNS
Common Mistakes That Cause Downtime
Avoid these and you’ll stay safe:
- Deleting records too early
- Leaving TTL too high
- Changing MX records instantly
- Forgetting SPF updates
- Switching nameservers blindly
- Making multiple changes at once
Slow and steady wins here.
Conclusion
Updating DNS records doesn’t have to be stressful. With the right approach, you can make changes in DirectAdmin without any downtime at all. The key is preparation, patience, and never rushing the process.
Whether you’re moving servers, changing email providers, or adding new services, these steps keep your website live and your emails flowing.
FAQs
1. How long should I lower TTL before DNS changes?
At least 30 minutes — 24 hours.
2. Can I update DNS during business hours?
Yes, if you follow the zero-downtime method.
3. Will users notice anything?
No — changes happen silently when done correctly.
4. What’s the safest TTL value?
300 seconds (5 minutes) is ideal during updates.
5. What if something goes wrong?
Restore the old DNS record — that’s why we don’t delete it first.
Need help? Our friendly support team is always here for you! Reach out below.
Happy hosting! 🌟