When you move your website to a new hosting provider like telaHosting, DNS propagation can take a little time before your domain starts pointing to the new server. During this period, your website might still load from your old hosting or may not load at all.
What Is a Temporary URL?
A temporary URL is a special link provided by your hosting server that allows you to access your website even before your domain points to it.
It usually looks like this: http://123.45.67.89/~yourusername Or: http://server-name.telahosting.com/~yourusername
With this, you can:
- View your website
- Install WordPress
- Edit files
- Test plugins
- Check your design
- Install SSL later
All without touching your DNS yet.
Why You Need a Temporary URL
You’ll find a temporary URL helpful when:
- You’re migrating from one host to another
- DNS propagation is still ongoing
- You want to develop a site quietly before launch
- You want to preview a new design without going live
- You’re troubleshooting domain pointing issues
In short, a temporary URL keeps your workflow smooth, even when your domain isn’t ready.
Benefits of Using a Temporary URL
Using a temporary web address gives you:
- Zero downtime
- Ability to build your site quietly
- Smooth migration from old host
- No waiting for DNS propagation
- Full access to test site features
- Ability to fix errors before going live
This is one of the easiest ways to ensure your website launches smoothly on telaHosting.
Step 1: Log In to Your cPanel
- First, log in to your telaHosting Client Area using your registered email and password.
- From the dashboard, select your hosting account and click “Log in to cPanel” to access the dashboard.
Once inside, you’re ready to access your temporary link.
Step 2: Find Your Temporary URL (Two Methods)
There are two ways to get the temporary URL in cPanel.
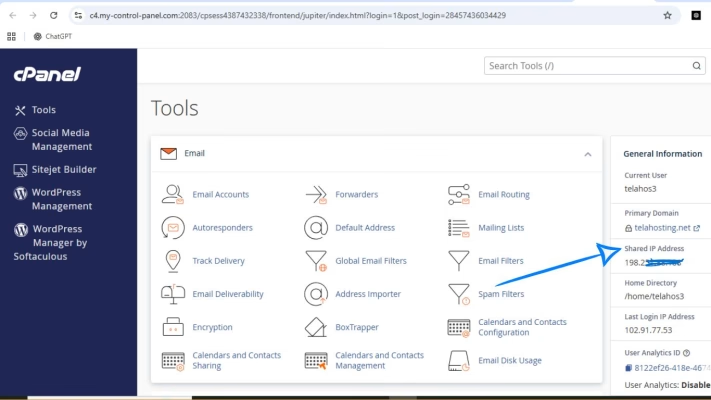
Method 1: Check Your cPanel Username and Server IP
To create a temporary URL manually, you need:
- Server IP address
- cPanel username
How to find these:
Find server IP:
- In cPanel, look at the right sidebar
- Locate Shared IP Address
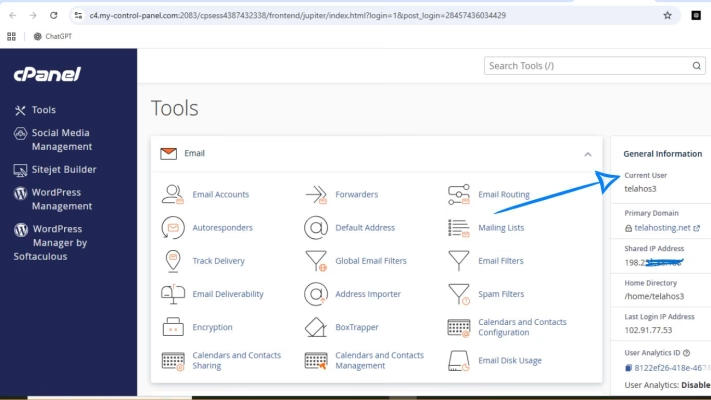
Find cPanel username:
You’ll see it at the top right of cPanel or in the sidebar.
Once you have both, use this format: http://SERVER-IP/~USERNAME
Example:
- IP: 102.165.45.10
- Username: johnsite
Temporary web address becomes: http://102.165.45.10/~johnsite
Open it in your browser — that’s your live website on telaHosting.
Method 2: Request Temporary URL from telaHosting Support
Some servers disable temporary URLs for security reasons, especially modern ones. If your temporary web addresss doesn’t work, simply reach out to our support team: “Hi, please share my temporary web address. My domain is example.com.”
You’ll receive the correct, active temporary web address instantly.
Step 3: Install or Preview Your Website Using the Temporary URL
Now that you have your temporary link, you can:
- Install WordPress: Using Softaculous → WordPress → Install
- Upload your site files: Through File Manager or FTP. Learn how to upload website.
- Preview your entire website: Just click the temporary URL — it loads your site exactly as your domain will.
- Test themes and plugins: Perfect for development before going live.
- Check database connections: This ensures everything works on the new server.
Step 4: Fix WordPress URLs (If You’re Testing a WordPress Site)
By default, WordPress uses your domain URL. So if you’re using a temporary web address, you must switch it temporarily. Do this:
- Log in to WordPress dashboard (via temporary web address)
- Go to Settings → General
- Change both WordPress Address (URL) and Site Address (URL) to your temporary URL: http://IP/~username
- Save.
Now your site works perfectly until DNS propagation finishes.
Step 5: Switch Back to Your Main Domain (After DNS Propagation)
Once your domain fully points to telaHosting:
- Log in to WordPress again
- Go to Settings → General
- Change URL back to: https://yourdomain.com
- Fix permalinks: Go to Settings → Permalinks → Save
Your domain is now fully connected.
What If SSL Doesn’t Work Yet?
Temporary URLs do not have SSL certificates. That’s normal.
Once DNS finishes propagation:
- AutoSSL will activate
- HTTPS will start working
- No action needed from your side
If needed, you can manually install SSL from: cPanel → SSL/TLS Status → Run AutoSSL
Common Issues and Their Fixes
1. Temporary URL Loads a Blank Page: Solution: Make sure your site files are in /public_html.
2. WordPress Dashboard Redirects to Your Domain: Fix WordPress URL inside: wp-admin → Settings → General
3. Images Don’t Display: Clear cache or update WordPress URLs.
4. Temporary URL Not Working: Contact our support — some servers restrict it for security.
Conclusion
Using a temporary URL is one of the most underrated features in cPanel, but it’s a lifesaver when you’re migrating a website, building a new design, or simply waiting for DNS propagation. Instead of sitting and waiting, you can work on your site immediately — stress-free and without interruptions.
FAQs
1. Can I use a temporary URL on any hosting?
Not always — but telaHosting fully supports it.
2. Does a temporary URL support HTTPS?
No, only HTTP. SSL works after DNS propagation.
3. Will my website look exactly the same?
Yes, everything loads normally.
4. Can I install WordPress using a temporary URL?
Absolutely — it’s perfect for testing before launch.
5. What if my temporary web address doesn’t work?
telaHosting support can activate it instantly.
Need help? Our friendly support team is always here for you! Reach out below.
Happy hosting! 🌟