What Is a Subdomain?
A subdomain is like a smaller branch of your main website. It appears before your main domain name, separated by a dot. For example:
- blog.telahosting.com (for your blog)
- shop.telahosting.com (for your online store)
- support.telahosting.com (for your helpdesk)
A subdomain helps you divide your website into different sections without needing a completely new domain. It’s perfect for managing multiple parts of your business under one main brand.
So instead of buying separate domains, you can use subdomains to create a cleaner and more organized online presence.
Why Use Subdomains?
- Organization: You can separate different functions of your site, like a blog, store, or forum.
- Brand Consistency: It keep your brand name (main domain) visible everywhere.
- Ease of Management: You can host subdomains on the same or different servers.
- SEO Advantages: When used strategically, it can help target specific audiences or keywords.
- Testing or Development: Many developers use it to create testing environments (e.g., dev.yourdomain.com).
What You’ll Need
- Access to your cPanel account (provided by telaHosting).
- A registered domain connected to your hosting.
- The idea or purpose for your subdomain (e.g., blog, store, support).
Step 1: Log in to Your cPanel Account
- First, log in to your telaHosting Client Area using your registered email and password.
- From the dashboard, select your hosting account and click “Log in to cPanel” to access the dashboard
Step 2: Find the “Domains” Section
- Scroll down to find the Domains section.
- Click on “Zone Editor.”
This is where you’ll create and manage DNS records for your domain — including the one needed to make your subdomain work.
Step 3: Choose the Domain You Want to Add a Subdomain To
If you have multiple domains under your account, choose the main domain you want to use for your secondary domain. For example, if you want to create blog.telahosting.com, you’ll select telahosting.com from the list and click “Manage.”
Step 4: Add a New A Record for the Subdomain
Click “+ Add Record” and choose A Record as the type. Then fill in the following details:
- Name: Enter your subdomain name (for example, blog or shop).
- TTL (Time to Live): Leave it as the default (e.g., 14400 seconds).
- Type: Select “A.”
- Record/Address: Enter the IP address of your hosting server (you can find this in your cPanel under Server Information).
- Click “Save Record.”
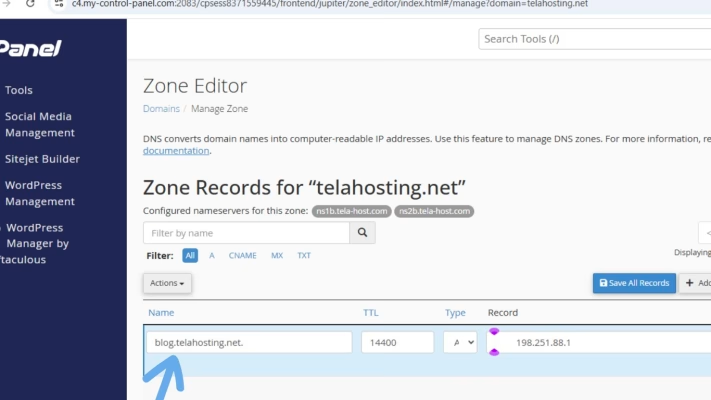
This tells the internet that “blog.telahosting.com” should point to your hosting server’s IP address — just like your main domain.
Step 5: Wait for DNS Propagation
After saving, the new A record will need time to update across the internet which is a process called DNS propagation. This usually takes anywhere between a few minutes and 24 hours.
Once propagation is complete, your new subdomain will start working.
Step 6: Create a Folder for the Subdomain (Optional)
While the DNS A record connects your secondary domain to your hosting server, you’ll also want to make sure there’s a folder in your hosting space for it.
To do this:
- Go back to your cPanel home page.
- Scroll to the Domains section again.
- Click “Subdomains.” or “Domain.”
- Enter your subdomain name (e.g., “blog”).
- cPanel will automatically create a new folder inside your public_html directory — like public_html/blog.

You can upload or install a separate website in that folder, completely independent from your main site.
How to Test if Your Subdomain Works
To check if your secondary domain is live, simply type it in your browser: for example: blog.telahosting.com. If it loads (even if it’s blank or shows a default cPanel page), that means your DNS setup is correct. If it doesn’t load yet, give it a bit more time for DNS propagation to complete.
How to Troubleshoot Common Subdomain Issues
If your new domain doesn’t seem to work after a while, here are some common fixes:
- Double-check the IP address in your A record. Make sure it matches your hosting server.
- Clear your browser cache or use incognito mode to load the latest version.
- Check propagation using tools like dnschecker.org.
- Confirm name servers — if your domain isn’t registered with us at telaHosting, make sure it uses telaHosting’s name servers.
Final Thoughts
Creating a subdomain using DNS in cPanel is really just a few clicks away. You add an A record, link it to your server’s IP, wait a little for propagation, and finally your secondary domain is live!
Need help? Our friendly support team is always here for you! Reach out below.
Happy hosting! 🌟