What is Microsoft 365 Email?
Microsoft 365 email is essentially Outlook email hosted on Microsoft’s cloud servers. Instead of using a free Gmail or Yahoo account, you get a business-class email address like [email protected]. This makes your communication look more professional and trustworthy.
Why DNS Records Matter for Microsoft 365 Emails
DNS records are like an “address book” of the internet. When someone sends you an email, DNS records tell the servers where to deliver it. If your DNS isn’t set up correctly, emails may bounce back, land in spam, or not arrive at all.
For Microsoft 365, the key DNS records you’ll need to set up are:
- MX Records: Direct incoming emails to Microsoft’s mail servers.
- CNAME Records: Help with authentication and services like Autodiscover.
- TXT Records (SPF): Prevent spammers from sending emails pretending to be you.
- SRV Records: Support advanced services like Skype for Business.
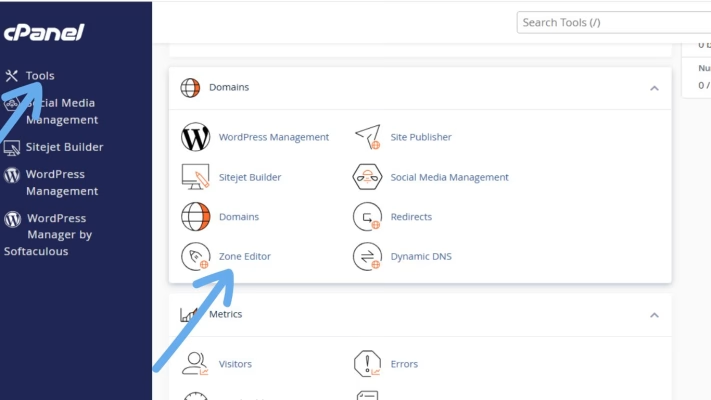
Step 1: Log in to Your cPanel
- Go to your telaHosting cPanel login page.
- Enter your username and password.
- Once inside, look for the Zone Editor option. This is where you’ll manage DNS records.
Step 2: Add the MX Record
- In the Zone Editor, click Add Record.
- Choose MX Record.
- Enter the following details:Priority: 0, Destination: yourdomain-com.mail.protection.outlook.com (replace yourdomain-com with your actual domain name).
- Save the record.
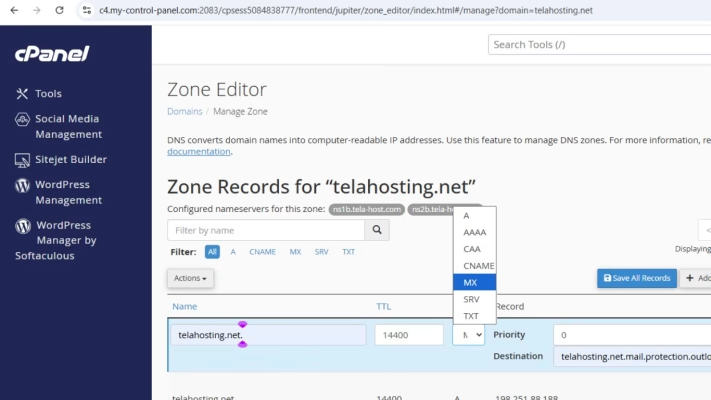
This ensures all incoming emails are routed through Microsoft 365 servers.
Step 3: Add the TXT Record (SPF)
- Still in the Zone Editor, select Add Record.
- Choose TXT Record.
- Paste this value: v=spf1 include:spf.protection.outlook.com -all
- Save it.
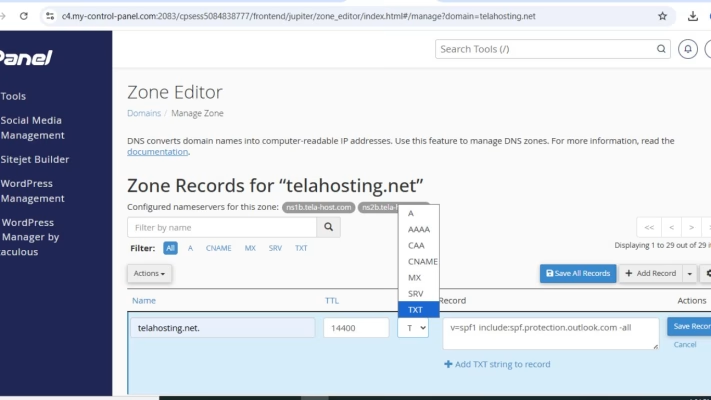
This record tells other servers that Microsoft 365 is authorized to send emails on behalf of your domain.
Step 4: Add the CNAME Records
Microsoft 365 requires a few CNAME records for services like Autodiscover and verification. Add them one by one:
- Host: autodiscover → Points to: autodiscover.outlook.com
- Host: sip → Points to: sipdir.online.lync.com
- Host: lyncdiscover → Points to: webdir.online.lync.com
- Host: enterpriseregistration → Points to: enterpriseregistration.windows.net
- Host: enterpriseenrollment → Points to: enterpriseenrollment.manage.microsoft.com

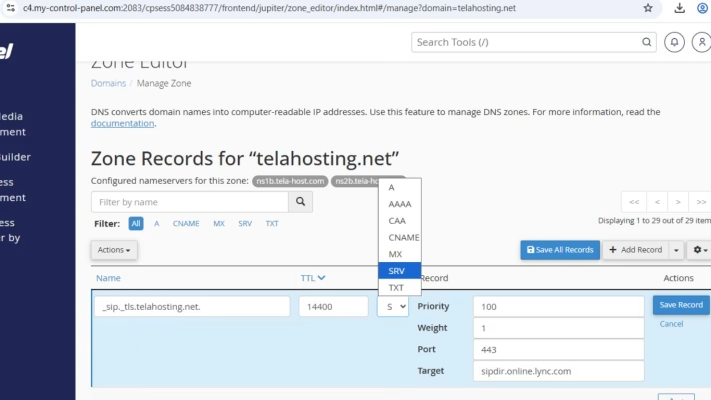
Step 5: Add the SRV Records
SRV records help with Skype for Business and other advanced features. Add these:
- Name:_sip._tls | Target: sipdir.online.lync.com | Port: 443 | Priority: 100 | Weight: 1
- Name: _sipfederationtls._tcp | Target: sipfed.online.lync.com | Port: 5061 | Priority: 100 | Weight: 1
Step 6: Verify Your Setup in Microsoft 365
After adding all the records, log in to your Microsoft 365 Admin Center. Use the Domain Setup Wizard to verify that your DNS records are correct. It may take a few minutes (sometimes up to 24 hours) for changes to propagate across the internet.
Final Thoughts
Setting up Microsoft 365 email DNS records in cPanel might sound technical, but once you break it down, it’s just a matter of entering the right values in the right places. With telaHosting, you already have a reliable hosting partner in Nigeria, so all you need to do is follow these steps carefully.
Need help? Our friendly support team is always here for you! Reach out below.
Happy hosting! 🌟