If you’re running ads, managing a brand page, or using Meta Business Manager for Facebook and Instagram, verifying your domain is one step you can’t skip. It gives you more control over your content, improves security, and tells Meta that you are the real owner of your domain.
Why You Need to Verify Your Domain on Meta
- Proves you own your website
- Allows you to manage link previews
- Prevents unauthorized content editing
- Improves brand trust and security
- Required for some ad features and pixel events
If you’re serious about your brand on Facebook or Instagram, domain verification is a must.
What You Need Before You Begin
Here’s everything you should have ready:
- Access to your Meta Business Manager
- Your domain
- Access to DirectAdmin DNS management
- No conflicting DNS errors
Once you have this, the entire setup becomes very smooth.
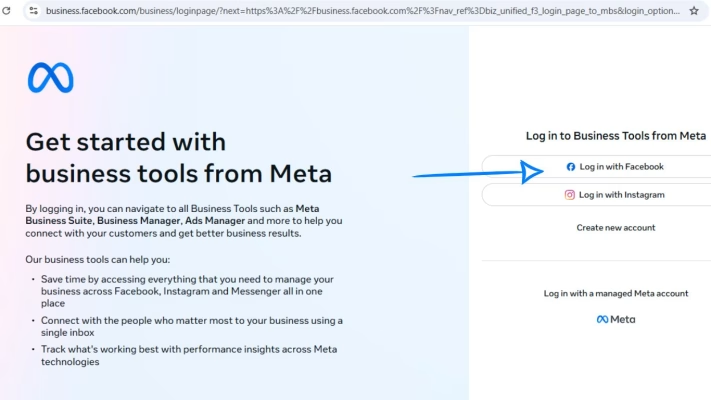
STEP 1: Open Meta Business Manager
1. Visit business.facebook.com
2. Go to Business Settings

3. Scroll down to Brand Safety

4. Click Domains
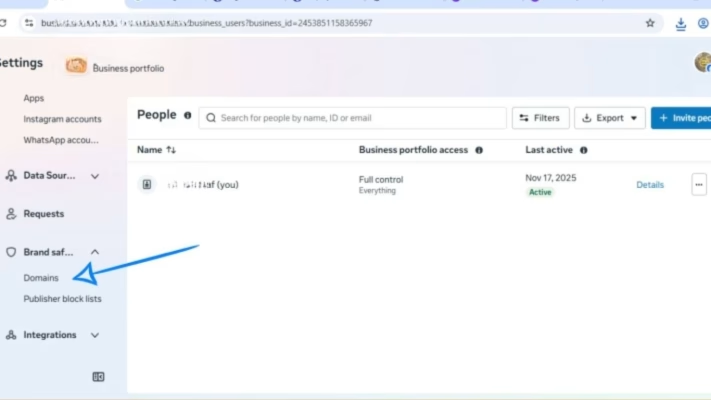
You’ll now see a button that says Add Domain.
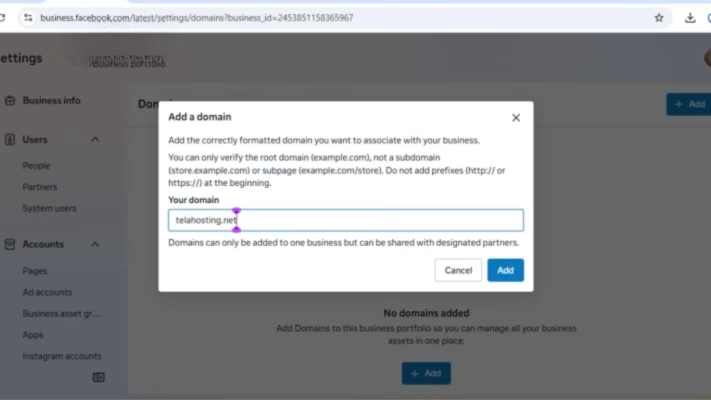
STEP 2: Add Your Domain Name
- Click Add
- Type your domain name (example: yourdomain.com)
- Select the domain you just added
Meta will now show you three verification methods:
- HTML file upload
- Meta-tag verification
- DNS TXT record (this is what we need)
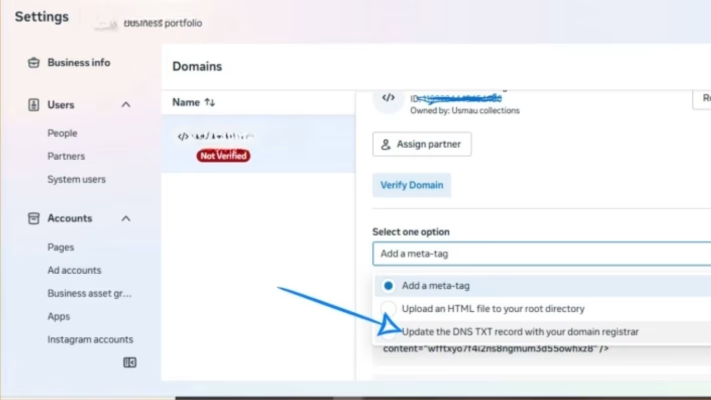
Choose DNS Verification.
STEP 3: Copy the TXT Verification Record Provided by Meta
Meta will show you a TXT record like: facebook-domain-verification=your-verification-code-here
This is the code we’ll add inside DirectAdmin.
Copy it.
STEP 4: Log Into DirectAdmin
- Open your telaHosting Client Area
- Click your hosting package
- Click Login to DirectAdmin
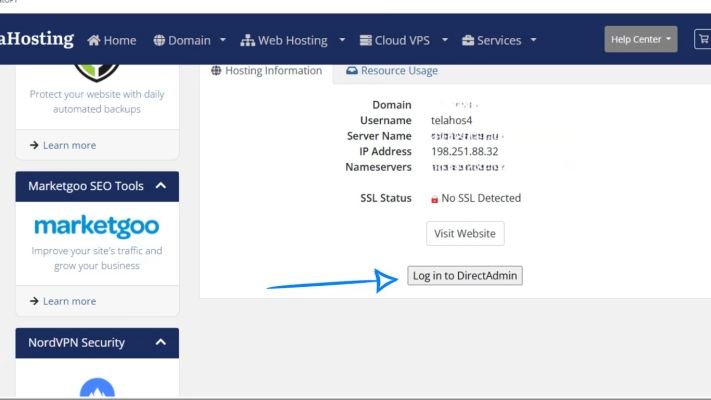
Once inside DirectAdmin, we can now add the TXT record.
STEP 5: Open DNS Management
Inside DirectAdmin:
- Go to Account Manager
- Click DNS Management
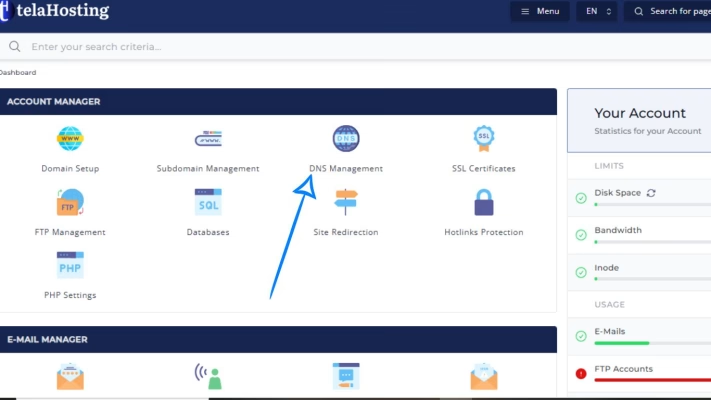
This is where all DNS editing takes place.
STEP 6: Add the TXT Verification Record
- Click Add Record
- Select TXT Record
- In Name, leave blank or enter your domain
- In Value, paste the TXT record from Meta: facebook-domain-verification=your-verification-code-here
- Click Save
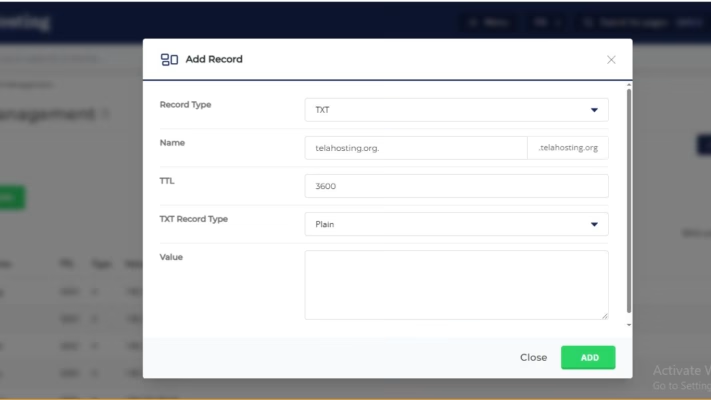
That’s it — DNS record added!
STEP 7: Wait for DNS Propagation
DNS changes take a little time to propagate usually:
- 5–15 minutes locally
- Up to 24 hours globally
You can check your DNS using:
Just search your TXT record.
STEP 8: Return to Meta and Click “Verify”
Once your DNS record is live:
- Go back to the Meta domain verification screen
- Click Verify Domain
If your DNS has updated, Meta will instantly recognize the TXT record and mark your domain as Verified.
If it doesn’t verify immediately, wait 10–20 minutes and try again.
STEP 9: Assign Your Domain to Your Business Assets (Optional but recommended)
After verification:
- Still inside Business Settings
- Choose Domains
- Select your domain
- Assign it to:
- Your Facebook page
- Your Instagram account
- Your Ad account
This ensures that only you can edit link previews and run ads with your domain.
Troubleshooting Tips (If Verification Fails)
If your domain doesn’t verify, here are the most common fixes:
1. Make sure you added the TXT record correctly
No extra spaces
No extra dots
No wrong labels
2. Make sure you are editing the correct domain
Especially if you have subdomains like blog.yourdomain.com.
3. Make sure you don’t have duplicate TXT records
Meta only needs one.
4. Give it more time
Some locations may take up to 1 hour to update.
Conclusion
Verifying your domain on Meta using DirectAdmin DNS is surprisingly easy once you know exactly where to click. In just a few minutes, you can improve security, control your link previews, and unlock powerful advertising features for your brand.
FAQs
1. Do I need to remove the TXT record after verification?
No — keep it to avoid losing verification.
2. Will verification affect my website?
Not at all. TXT records do not change how your website works.
3. Can I verify multiple domains?
Yes. Meta allows unlimited domain verifications.
4. My domain isn’t verifying — what should I do?
Check your DNS for mistakes or wait a bit longer for propagation.
Need help? Our friendly support team is always here for you! Reach out below.
Happy hosting! 🌟