Why Use Cloudflare?
Cloudflare gives your website several important benefits:
- Faster loading time
- Free SSL (if needed)
- DDoS protection
- CDN for global performance
- Better uptime and security
But to enjoy all of these, you need to correctly connect your domain — and that’s where DNS records come in.
What You Will Need
- Your domain
- Access to DirectAdmin
- A Cloudflare account
- Cloudflare nameservers (you’ll get these after adding your site)
Once everything is ready, the setup becomes straightforward.
STEP 1: Add Your Website to Cloudflare
- Go to https://dash.cloudflare.com
- Log in (or create an account)
- Click on connect a domain
- Enter your domain name (example: yourdomain.com)
- Choose the Free Plan (works perfectly for most sites)
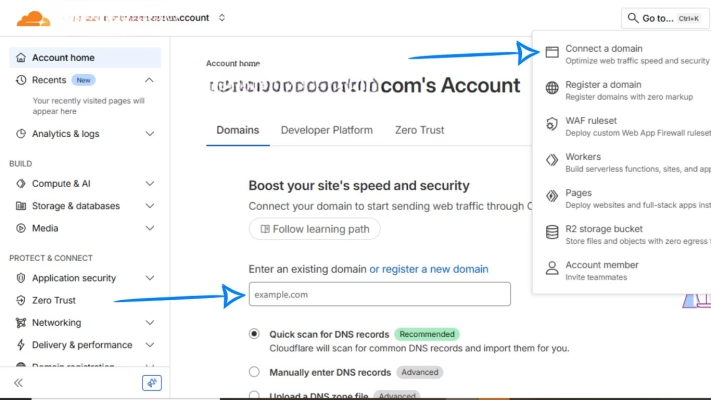
Cloudflare will now scan your existing DNS records.
STEP 2: Review the DNS Records Cloudflare Detected
Cloudflare will show you a list of your current DNS records.
Make sure the following exist:
- A Record pointing to your hosting IP
- CNAME for www pointing to your root domain
- MX records for email
- Any TXT, SPF, DKIM, or custom records
If something is missing, you will add it manually in Cloudflare after switching nameservers.
But first, you’ll update your DNS in DirectAdmin.
STEP 3: Copy Your Cloudflare Nameservers
Cloudflare will give you two nameservers, for example:
- ns.cloudflare.com
- ns.cloudflare.com
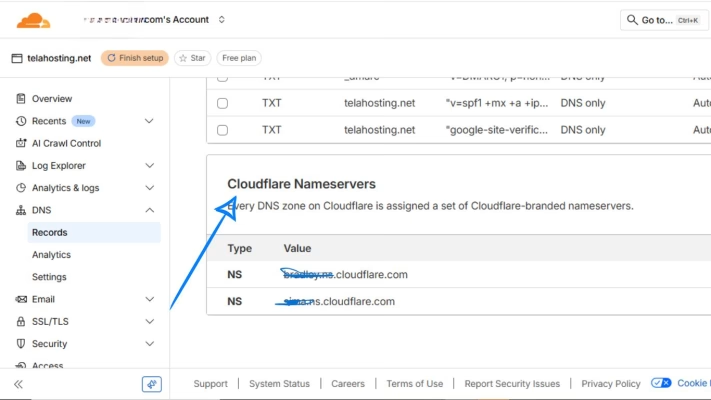
These are important because you’ll replace your telaHosting nameservers with them. After switching nameservers, Cloudflare will manage your DNS.
STEP 4: Log In to DirectAdmin
- Go to your telaHosting Client Area
- Click your hosting package
- Select Login to DirectAdmin
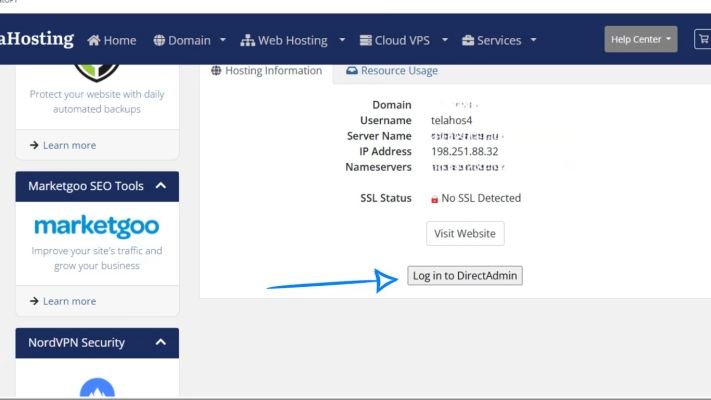
This opens your hosting control panel where DNS settings live.
STEP 5: Open Domain Settings
Inside DirectAdmin:
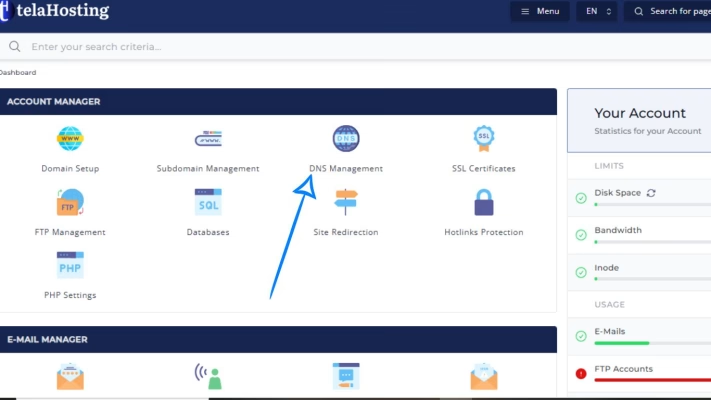
- Go to Account Manager
- Click DNS Management
- You will see your domain’s DNS zone records
Before enabling Cloudflare, you may need to confirm your hosting IP if you want Cloudflare to proxy traffic correctly.
STEP 6: Add or Verify Important DNS Records Before Switching
Cloudflare will import your DNS automatically, but you should confirm the essential records in DirectAdmin first.
1. A Record (Website)
- Name: @ or yourdomain.com
- Type: A
- Value: your hosting server IP (provided by telaHosting)
2. CNAME (www)
- Name: www
- Type: CNAME
- Value: yourdomain.com
3. MX Records (Email)
If you’re using telaHosting email:
- Name: @
- Type: MX
- Value: mail.yourdomain.com
- Priority: 10
4. TXT Records (SPF / verification)
Example SPF: v=spf1 a mx include:relay.telaemail.com ~all
Any additional TXT records (Google, Meta, Microsoft, etc.) should also be verified.
STEP 7: Change Your Nameservers to Cloudflare
Now go back to your telaHosting Client Area:
1. Click Domains
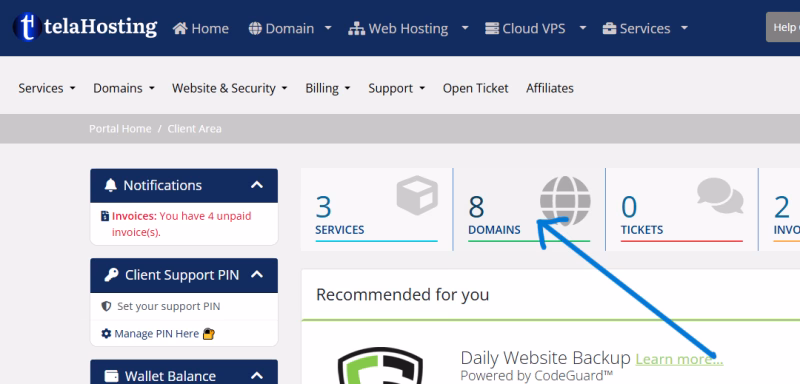
2. Select your domain
3. Go to Nameservers
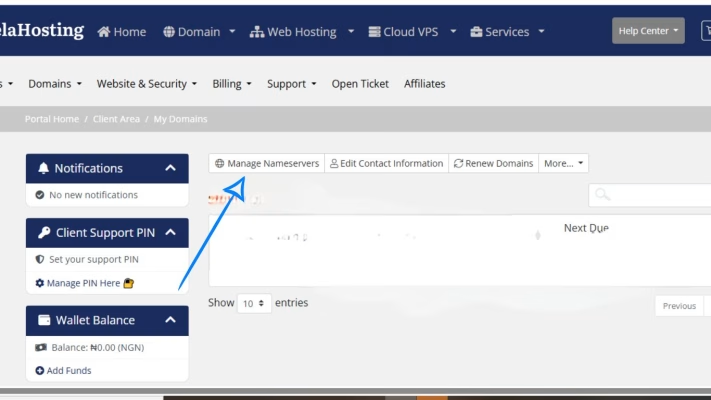
4. Replace the current nameservers with the Cloudflare nameservers:
Example:
- ns.cloudflare.com
- ns.cloudflare.com
5. Save changes
Once done, Cloudflare becomes your DNS manager.
STEP 8: Wait for DNS Propagation
DNS propagation normally takes:
- 10–30 minutes
- Up to 24 hours globally
Cloudflare will notify you once your domain is active.
During this time, do not edit DNS in DirectAdmin anymore — all DNS changes must now be done inside Cloudflare.
STEP 9: Add or Edit DNS Records in Cloudflare (If Needed)
After activation, go to: Cloudflare Dashboard → DNS → Records
This is where you’ll add any records required for:
- Website hosting
- Email routing
- Google Workspace
- Microsoft 365
- SPF/DKIM/DMARC
- Meta verification
- API services
- SRV records
Make sure:
- All A, CNAME, and MX records match your telaHosting setup
- Cloudflare Proxy (orange cloud) is ON for website traffic
- Proxy is OFF for email records (MX, SPF, DKIM, DMARC must be grey cloud)
Conclusion
The most important part of setting up your cloudflare is updating your nameservers and verifying your DNS records correctly before and after the migration.
Once your domain is fully connected, you benefit from:
- Faster performance
- Stronger security
- Better uptime
- Free SSL
- Smart caching
Whether you’re a beginner or a business owner managing your site, Cloudflare gives you powerful tools.
FAQs
1. Should I edit DNS in DirectAdmin after switching to Cloudflare?
No. All DNS management moves to Cloudflare.
2. How long does nameserver change take?
Usually 10–30 minutes, but globally up to 24 hours.
3. Will Cloudflare affect my email?
No — as long as your email records are set to DNS Only (grey cloud).
4. Does Cloudflare give free SSL?
Yes, Cloudflare provides free SSL certificates.
5. Can I switch back from Cloudflare later?
Yes — simply restore telaHosting nameservers and DNS resumes in DirectAdmin.
Need help? Our friendly support team is always here for you! Reach out below.
Happy hosting! 🌟